新的6月,愿你别爱的太满,别睡的太晚。
当你开始爱自己,全世界都会爱你。
崭新的6月,
愿你,
不再为过去苦恼,
也别再为明天担忧;
令人希冀的6月,
愿你,
远离一切不健康的东西,
不论是人还是饮食,
不论是事物还是环境;
无限可能的6月,
愿你,
只做有趣和快乐的事,
余生很长,不必慌张。
sw360dp :
sw表示smallest screen width, 设备使用比设备本身小最接近的文件夹。比如一个设备最小的屏幕宽度是380dp,现在有sw360dp文件夹和sw411dp文件夹,那么会使用哪个文件夹的资源?会使用sw360dp的,因为sw411dp要求最小屏幕宽度是411dp,你的设备最小屏幕宽度是360dp,那么大于360dp并且小于411dp这部分的布局就不够空间显示。
xhdpi:
如果设备是xhdpi,现在有hdpi文件夹和xxhdpi的资源,它会使用哪个文件夹的资源呢?会使用xxhdpi的,因为使用更好分辨率的资源,可以把它按比例压缩到小分辨率的资源而不会失真,如果使用hdpi的资源,需要把它进行按比例拉伸到合适的大小才能使用。
最清晰的Android多屏幕适配方案
http://blog.csdn.net/shimiso/article/details/52061376#t0
使用dp单位
在需要适配的地方使用引用,在不同的最小屏幕和像素密度的文件夹里面创建一份对应的尺寸。例如: mdpi, hdpi, xhdpi, xxhdpi, xxxhdpi, sw320dp-hdpi, sw320dp-xxhdpi, sw360dp-hdpi, sw411dp-xxhdpi, w360dp, h360dp, values-480x320, values-854x480, values-1920x1080, values-v11, values-v14, values-24等等。
selector, layer-list, shape, vector, animated-vector, path标签等xml文件放在drawable文件夹。可以使用这些创建的图形,最好不用图片资源。
selector: http://blog.csdn.net/jiankeufo/article/details/73845750?from=singlemessage
shape: https://www.cnblogs.com/popfisher/p/6238119.html
图片资源创建一套放在drawable-xxhdpi,Android系统会根据设备的分辨率来自动缩放适配,不用为不同分辨率的设备创建多套图片资源,以达到减少apk大小。
使用.9文件(nine-patch)图片,可以满足特殊拉伸图片的情况。这样就不用为每种分辨率创建一套图片资源。
在代码中动态需要使用像素px单位的地方,可以通过设备密度来计算 px = (int)(density * dp) + 0.5 来计算出来。tip:这里加0.5是为了四舍五入的作用。
对于字体大小使用sp, dp的区别:
当修改系统字体大小时,字体大小以sp为单位时,大小跟随变化;
dp:
dp是一种密度无关像素,对应于 160dpi 下像素的物理尺寸
sp:
sp是和dp相同的基本单位,但它会按用户首选的文本尺寸进行缩放(属于缩放无关像素)
从源代码注释可以看到:
scaledDensity会收到用户配置的影响,而density不会.
这也就是为什么设置sp单位时字体大小会受到用户配置系统字体的影响.
Android中dp,px,sp概念梳理以及如何做到屏幕适配
http://blog.csdn.net/jiangwei0910410003/article/details/40509571
https://www.jianshu.com/p/23324a57352d
| 密度类型 | 代表的分辨率(px) | 屏幕像素密度(dpi)|
| - | :-: | -: |
| 低密度(ldpi) | 240x320 | 120 |
| 中密度(mdpi) | 320x480 | 160 |
| 高密度(hdpi) | 480x800 | 240|
| 超高密度(xhdpi) | 720x1280 | 320|
| 超超高密度(xxhdpi) | 1080x1920 | 480 |

屏幕尺寸、分辨率、像素密度三者关系
一部手机的分辨率是宽x高,屏幕大小是以寸为单位,那么三者的关系是:

Android 屏幕适配:最全面的解决方案:
https://www.jianshu.com/p/ec5a1a30694b
使得布局元素自适应屏幕尺寸
使用相对布局(RelativeLayout),禁用绝对布局(AbsoluteLayout)
开发中,我们使用的布局一般有:
线性布局(Linearlayout)
相对布局(RelativeLayout)
帧布局(FrameLayout)
绝对布局(AbsoluteLayout)
用”wrap_content”、”match_parent”和”weight“来控制视图组件的宽度和高度
常用图标规范尺寸:
L DPI ( Low Density Screen,120 DPI ),其图标大小为 36 x 36 px
M DPI ( Medium Density Screen, 160 DPI ),其图标大小为 48 x 48 px
H DPI ( High Density Screen, 240 DPI ),其图标大小为 72 x 72 px
XH DPI ( Extra-high density screen, 320 DPI ),其图标大小为 96 x 96 px
XXH DPI( xx-high density screen, 480 DPI ),其图标大小为144 x 144 px
XXXH DPI( xxx-high density screen, 640 DPI ),其图标大小为192 x 192 px
http://blog.csdn.net/ys743276112/article/details/51910874
注意小数点强制转换后的精确度降低导致的显示问题。例如: 前面几个布局的高度都四舍五入相加后,总高度的和可能会少了两三个像素px单位。
全局设置
a. 设置用户信息
$ git config --global user.name "Your Name"
$ git config --global user.email "email@example.com"
b. 设置编辑器
$ git config --global core.editor emacs
c. 设置差异比较器
$ git config --global merge.tool vimdiff
d. 设置显示不同的颜色
$ git config --global color.ui true
e. 查看全局设置信息
$ git config --global -l
SSH Key设置
a. 生成SSH key
$ ssh-keygen -t rsa -C "youremail@example.com"
b. 复制id_rsa.pub内容到粘贴板中
$ cat ~/.ssh/id_rsa.pub
c. 登陆Github > 设置 > SSH and GPG Keys > new SSH key
d. 复制粘贴板中的内容到key文本编辑框中
e. 点击Add SHH key按钮
f. 查看是否设置SSH成功
$ ssh [-p port] git@github.com
创建仓库
a. 进入需要创建仓库的目录
$ mkdir studygit
$ cd studygit
$ pwd
/Users/username/studygit
b. 在当前目录创建仓库
$ git init
添加远程库
a. 把一个已有的本地仓库与远程仓库关联
$ git remote add origin git@github.com:liangyunfeng/git.study.git
b. 本地库的所有内容推送到远程库上
由于远程库是空的,我们第一次推送master分支时,加上了-u参数,Git不但会把本地的master分支内容推送的远程新的master分支,还会把本地的master分支和远程的master分支关联起来,在以后的推送或者拉取时就可以简化命令。
$ git push -u origin master
c. 之后推送本地库到远程库上使用
$ git push origin master
把文件添加到暂存区
$ git add readme.txt
把文件添加到版本库
$ git commit -m "wrote a readme file"
查看仓库的当前状态
$ git status
查看修改内容
$ git diff readme.txt
查看提交历史
$ git log
查看命令历史
$ git reflog
版本回退
$ git reset --hard commit_id
$ git reset --hard HEAD <filename>
$ git reset --hard HEAD^^
$ git reset --hard HEAD~2
撤销修改
$ git checkout -- file
命令git checkout – file意思就是,把file文件在工作区的修改全部撤销,这里有两种情况:
一种是file自修改后还没有被放到暂存区,现在,撤销修改就回到和版本库一模一样的状态;
一种是filet已经添加到暂存区后,又作了修改,现在,撤销修改就回到添加到暂存区后的状态。
把暂存区的修改撤销掉(unstage),重新放回工作区
$ git reset HEAD <file>
场景1:当你改乱了工作区某个文件的内容,想直接丢弃工作区的修改时,用命令git checkout – file。
场景2:当你不但改乱了工作区某个文件的内容,还添加到了暂存区时,想丢弃修改,分两步,第一步用命令git reset HEAD,就回到了场景1,第二步按场景1操作。
场景3:已经提交了不合适的修改到版本库时,想要撤销本次提交,参考版本回退git reset –hard commit_id,不过前提是没有推送到远程库。
删除文件
$ git rm test.txt
$ git commit -m "description"
工作区误删文件,恢复到版本库最新版本
$ git checkout -- file
关联远程库
$ git remote add origin git@server-name:path/repo-name.git
关联后,第一次推送master分支的所有内容
$ git push -u origin master
此后,提交到远程库
$ git push origin master
从远程库克隆
$ git clone git@server-name:path/repo-name.git
创建分支
$ git branch <name>
切换分支
$ git checkout <name>
查看分支
$ git branch
创建+切换分支
$ git checkout -b <name>
合并某分支到当前分支
$ git merge <name>
删除分支
$ git branch -d <name>
解决冲突
当Git无法自动合并分支时,就必须首先解决冲突。解决冲突后,再提交,合并完成。
解决冲突就是把Git合并失败的文件手动编辑为我们希望的内容,再提交。
查看分支合并图
$ git log --graph
普通模式合并某分支到当前分支
$ git merge --no-ff -m "merge with no-ff" <name>
合并分支时,加上–no-ff参数就可以用普通模式合并,合并后的历史有分支,能看出来曾经做过合并,而fast forward合并就看不出来曾经做过合并。
工作现场隐藏
$ git stash
查看工作现场
$ git stash list
工作现场恢复但不删除工作现场
$ git stash apply [stash@{0}]
工作现场恢复并删除工作现场
$ git stash pop
查看远程库信息
$ git remote
查看远程库详细信息
$ git remote -v
从本地推送分支
$ git push origin branch-name
从本地推送分支,使用git push origin branch-name,如果推送失败,先用git pull抓取远程的新提交;
在本地创建和远程分支对应的分支
$ git checkout -b branch-name origin/branch-name
建立本地分支和远程分支的关联
$ git branch --set-upstream branch-name origin/branch-name
从远程抓取分支
$ git pull
从远程抓取分支,使用git pull,如果有冲突,要先处理冲突。
关联远程库
$ git remote add <name> git@github.com:liangyunfeng/git.study.git
远程库重命名
$ git remote rename <oldname> <newname>
删除远程库
$ git remote rm <name>
重新设置基线
$ git rebase
原理很简单:rebase需要基于一个分支来设置你当前的分支的基线,这基线就是当前分支的开始时间轴向后移动到最新的跟踪分支的最后面,这样你的当前分支就 是最新的跟踪分支。这里的操作是基于文件事务处理的,所以你不用怕中间失败会影响文件的一致性。在中间的过程中你可以随时取消rebase 事务。git rebase –abort
git rebase其实可以把它理解成是“重新设置基线”,将你的当前分支重新设置开始点。这个时候才能知道你当前分支于你需要比较的分支之间的差异。
创建标签
$ git tag <tagname> [commitid]
可以指定commitid,默认为HEAD
git tag -a <tagname> -m "decription" [commitid]
创建带有说明的标签,用-a指定标签名,-m指定说明文字
查看标签
$ git tag
看标签信息
$ git show <tagname>
删除标签
$ git tag -d <tagname>
推送一个本地标签
$ git push origin <tagname>
推送全部未推送过的本地标签
$ git push origin --tags
删除一个远程标签
$ git push origin :refs/tags/<tagname>
忽略文件
忽略某些文件时,需要编写.gitignore;
gitignore文件本身要放到版本库里,并且可以对.gitignore做版本管理!
如果你确实想添加该文件,可以用-f强制添加到Git:
$ git add -f App.class
$ git check-ignore -v App.class
配置别名
$ $ git config --global alias.<name> 'option...'
$ git config –global alias.unstage ‘reset HEAD’
当你敲入命令:
$ git unstage file
实际上Git执行的是:
$ git reset HEAD file
搭建Git服务器
a. 安装git
$ sudo apt-get install git
b. 创建一个git用户,用来运行git服务:
$ sudo adduser git
c. 创建证书登录:
收集所有需要登录的用户的公钥,就是他们自己的id_rsa.pub文件,把所有公钥导入到/home/git/.ssh/authorized_keys文件里,一行一个。
d. 初始化Git仓库:
先选定一个目录作为Git仓库,假定是/srv/sample.git,在/srv目录下输入命令:
$ sudo git init --bare sample.git
Git就会创建一个裸仓库,裸仓库没有工作区,因为服务器上的Git仓库纯粹是为了共享,所以不让用户直接登录到服务器上去改工作区,并且服务器上的Git仓库通常都以.git结尾。然后,把owner改为git:
$ sudo chown -R git:git sample.git
e. 禁用shell登录:
出于安全考虑,第二步创建的git用户不允许登录shell,这可以通过编辑/etc/passwd文件完成。找到类似下面的一行:
git:x:1001:1001:,,,:/home/git:/bin/bash
改为:
git:x:1001:1001:,,,:/home/git:/usr/bin/git-shell
这样,git用户可以正常通过ssh使用git,但无法登录shell,因为我们为git用户指定的git-shell每次一登录就自动退出。
f. 克隆远程仓库:
现在,可以通过git clone命令克隆远程仓库了,在各自的电脑上运行:
$ git clone git@server:/srv/sample.git
git push
$ git push origin master
origin指定了你要push到哪个remote
master其实是一个“refspec”,正常的“refspec”的形式为”+: ”,冒号前表示local branch的名字,冒号后表示remote repository下 branch的名字。注意,如果你省略了 ,git就认为你想push到remote repository下和local branch相同名字的branch。听起来有点拗口,再解释下,push是怎么个push法,就是把本地branch指向的commit push到remote repository下的branch,比如:
$ git push origin master:master                (在local repository中找到名字为master的branch,使用它去更新remote repository下名字为master的branch,如果remote repository下不存在名字是master的branch,那么新建一个)
$ git push origin master                    (省略了<dst>,等价于“git push origin)master:master”)
$ git push origin master:refs/for/mybranch    (在local repository中找到名字为master的branch,用他去更新remote repository下面名字为mybranch的branch)
$ git push origin HEAD:refs/for/mybranch    (HEAD指向当前工作的branch,master不一定指向当前工作的branch,所以我觉得用HEAD还比master好些)
$ git push origin :mybranch                    (再origin repository里面查找mybranch,删除它。用一个空的去更新它,就相当于删除了)
git fetch 和 git pull 的区别
git fetch:相当于是从远程获取最新版本到本地,不会自动merge
$ git fetch origin master
$ git log -p master ../origin/master
$ git merge origin/master
以上命令的含义:
首先从远程的origin的master主分支下载最新的版本到origin/master分支上
然后比较本地的master分支和origin/master分支的差别
最后进行合并
git pull:相当于是从远程获取最新版本并merge到本地
$ git pull origin master
上述命令其实相当于git fetch 和 git merge
在实际使用中,git fetch更安全一些
因为在merge前,我们可以查看更新情况,然后再决定是否合并
git log
git log [<options>] [<since>..<until>] [[--] <path>...]
这条命令有很多参数选项
一、不带参数
    1.如果不带任何参数,它会列出所有历史记录,最近的排在最上方,显示提交对象的哈希值,作者、提交日期、和提交说明
    2.如果记录过多,则按Page Up、Page Down、↓、↑来控制显示
    3.按q退出历史记录列表

二、显示参数
    1.-p:按补丁显示每个更新间的差异,比下一条- -stat命令信息更全
    2.--stat:显示每次更新的修改文件的统计信息,每个提交都列出了修改过的文件,以及其中添加和移除的行数,并在最后列出所有增减行数小计
    3.--shortstat:只显示--stat中最后的行数添加修改删除统计
    4.--name-only:尽在已修改的提交信息后显示文件清单
    5.--name-status:显示新增、修改和删除的文件清单
    6.--abbrev-commit:仅显示SHA-1的前几个字符,而非所有的40个字符
    7.--relative-date:使用较短的相对时间显示(例如:"two weeks ago")
    8.--graph:显示ASCII图形表示的分支合并历史
    9.—pretty=:使用其他格式显示历史提交信息,可选项有:oneline,short,medium,full,fuller,email,raw以及format:<string>,默认为medium,如:
        1.--pretty=oneline:一行显示,只显示哈希值和提交说明(--online本身也可以作为单独的属性)
        2.--pretty=format:” ":控制显示的记录格式,如:
    10.--date= (relative|local|default|iso|rfc|short|raw):定制后边如果出现%ad或%cd时的日期格式

三、筛选参数:
    1.按数量
    2.按日期
    3.按作者
    4.按commit描述
    5.按文件
    6.按分支
    7.按内容
    8.按范围
    9.过滤掉merge commit
    10.按标签tag
    11.按commit
git help
$ git help
$ git clone -help
$ git init -help
$ git add -help
$ git tag -help
$ git pull -help
$ git push -help
$ git status -help
$ git commit -help
$ git checkout -help
$ git merge -help
$ git stash -help

1. 标题
2. 大图标
3. 内容文字
4. 内容信息
5. 小图标
6. 通知的时间(Timestamp,默认为系统发出通知的时间,也可通过setWhen()来设置)
通知栏框架(Notificaiton),它适用于Android系统中交互事件的通知。它主要由三部分组成:系统服务端NotificationManagerService,通知显示端SystemUI,还有创建和更新通知的App端。
NotificationManagerService作为框架的服务端,在系统启动时就会启动并在后台运行,显示端SystemUI作为系统UI进程,也是Notification框架的客户端,在系统启动时也会启动并一直运行。
其它模块需调用Notification时,只需要调用NotificationManager.notify(int,Notification)就可以发出通知。

根据Notification框架的原理,我们就分别按以下几点来分析:
1. Notification框架服务端启动过程
2. SystemUI进程启动和绑定NotificationManagerService服务端过程
3. Notification调用过程
4. Notification通知提示音响起过程
android/frameworks/base/services/java/com/android/server/SystemServer.java        //系统服务类启动的地方
android/frameworks/base/core/java/com/android/server/LocalServices.java            //系统服务类通信的辅助类
android/frameworks/base/core/java/android/service/notification/                    //Notification服务的接口类和监听类
android/frameworks/base/services/core/java/com/android/server/notification/        //NotificationManagerService服务相关的类
android/frameworks/base/core/java/android/app/        //NotificationManager、Notification类和INotificationManager.aidl的包
android/frameworks/base/packages/SystemUI/                                        //Notification显示的UI进程

SystemServer启动的Notification管理服务类是NotificationManagerService,保存到SystemServiceManager的是NotificationManagerService服务对象中的INotificationManager.Stub(),但是绑定到ServiceManager中Context.NOTIFICATION_ SERVICE的服务类是NotificationManager,所有开发者通过Context.getSystemService(Context.NOTIFICATION_SERVICE)获取回来的服务类不是NotificationManagerServiced服务对象,而是NotificationManager对象,需要再通过NotificationManager对象中的getService()方法,获取SystemServiceManager系统服务管理对象中保存的INotificationManager.Stub()对象。这样NotificationManager就能通过INotificationManager.Stub()对象和NotificationManagerService服务对象进行远程通信了
系统启动时,SystemServiceRegistry类中会把NotificationManager注册为系统服务提供给其它服务或者应用获取系统服务使用,
1 | /android/frameworks/base/core/java/android/app/SystemServiceRegistry.java |
在Activity或者Service中,可以直接通过Context.getSystemService(Context.NOTIFICATION_SERVICE)就可以获取系统服务使用。ActivityThread.performLaunchActivity()方法中创建ContextImpl对象并通过activity.attach()传递给Activity对象,再通过attachBaseContext()方法赋值给父类ContextWrapper中Context mBase对象,在Activity或者Service中调用getSystemService()方法,最终是调用ContextImpl中的getSystemService()方法。
1 | //android/frameworks/base/core/java/android/app/ContextImpl.java |
SystemServiceRegistry中注册的NotificationManager对象,其实不是真正的Notification服务,它只是一个调用接口对象,需要通过远程调用来实现和NotificationManagerService服务对象进行通信,真正实现相应的操作。以下是NotificationManagerService服务的启动流程。系统启动时会调用SystemServer来启动相应的系统服务对象。
1 | /android/frameworks/base/services/java/com/android/server/SystemServer.java |
SystemServer中调用NotificationManagerService的onStart()方法来启动NotificationManagerService服务。
1 | /android/frameworks/base/services/core/java/com/android/server/notification/NotificationManagerService.java |
至此,Notification框架的服务端就已经启动完毕,NotificationManagerService类只是管理Notification的逻辑,显示端是在SystemUI进程中实现的,那么NotificationManagerService服务对象和SystemUI进程间是怎么通信的呢?两个不同进程间通信,很多同学可能就会想到Android的远程过程调用(Remote Procedure Call,RPC)方式来实现,这种猜测是合理的,而且这里也的确是这么实现的。与很多其他的基于RPC的解决方案一样,Android使用一种接口定义语言(Interface Definition Language,IDL)来公开服务的接口。所以我们先来看下NotificationManagerService服务和SystemUI进程通信的服务接口文件:
1 | /android/frameworks/base/core/java/android/app/INotificationManager.aidl |
这个接口类的服务端就是NotificationManagerService服务对象中的INotificationManager.Stub对象mService
private final IBinder mService = new INotificationManager.Stub(){};
客户端可以通过以下方式来获取和服务端通信的桩对象:
IBinder b = ServiceManager.getService(Context.NOTIFICATION_SERVICE);
INotificationManager service = INotificationManager.Stub.asInterface(b);
SystemUI进程在初始化过程中,会创建一个NotificationListenerService服务类,服务对象中创建一个INotificationListener对象并通过远程过程调用把这个INotificationListener对象注册到NotificationManagerService服务对象的服务管理类子类NotificationListeners对象mListeners中
1 | /android/frameworks/base/packages/SystemUI/src/com/android/systemui/statusbar/BaseStatusBar.java |
Notification调用过程可以从应用开始,通过NotificationManager.notify()来发出通知,NotificationManager通过和NotificationManagerService服务对象通信,NotificationManagerService服务对象再利用通过NotificationListeners中监听的服务列表与SystemUI进程启动的系统服务NotificationListenerService中的INotificationListener对象通信,就可以调用SystemUI进程进行显示。

应用程序要发通知或取消通知,只需要获取系统的通知管理服务,调用notify或者cancel来操作通知即可。
1 | NotificationManager nm = (NotificationManager)getSystemService(Context.NOTIFICATION_SERVICE); //获取通知管理服务 |
NotificationManager是管理通知的服务类,它负责与NotificationManagerService服务对象通信,并通过调用NotificationManagerService服务对象添加、更新、删除通知等等,所支持的功能可以参照远程通信服务接口INotificationManager.aidl中公开的方法。
1 | /android/frameworks/base/core/java/android/app/NotificationManager.java |
NotificationManagerService服务对象只是处理逻辑,显示的逻辑是放在系统UI的进程SystemUI中去的,所以NotificationManagerService服务对象处理完逻辑后,还需要远程调用SystemUI进程去更新显示。所以SystemUI进程需要把INotificationListener服务对象注册到NotificationManagerService服务对象中来,当需要更新UI是,就可以通过INotificationListener服务对象回调SystemUI进程中的方法来更新。
1 | /android/frameworks/base/services/core/java/com/android/server/notification/NotificationManagerService.java |
INotificationListener服务对象是从BaseStatusBar对象中启动的系统服务BNotificationListenerService注册到NotificationManagerService对象中的,当NotificationManagerService服务对象通过INotificationListener服务对象回调SystemUI进程中的方法时,就可以调用BaseStatusBar对象中的方法来更新UI显示了。
1 | /android/frameworks/base/core/java/android/service/notification/NotificationListenerService.java |
PhoneStatusBar是BaseStatusBar的子类,实现了BaseStatusBar中的相关方法,addNotification()就是其中之一,这个方法是用来添加Notification和状态栏通知图标的。
1 | /android/frameworks/base/packages/SystemUI/src/com/android/systemui/statusbar/phone/PhoneStatusBar.java |
StatusBarIconController是状态栏图标控制的类,用来控制状态栏通知图标显示和系统图标显示等等。
1 | /android/frameworks/base/packages/SystemUI/src/com/android/systemui/statusbar/phone/StatusBarIconController.java |
把状态栏通知图标和通知行布局都分别添加到相应的容器类后,显示部分的逻辑也就完成了。
SystemUI的RingtonePlayer服务通过IAudioService.setRingtonePlayer(IRingtonePlayer)把IRingtonePlayer实现的回调接口对象注册到AudioService服务中,第三方App调用NotificationManager.notify()时,会调用NotificationManagerService中的enqueueNotificationInternal方法中的buzzBeepBlinkLocked()方法,这个方法会通过IAudioService.getRingtonePlayer()获取AudioServoce中的IRingtonePlayer对象,并调用回调方法来调用SystenUI.RingtonePlayer.mCallback的playAsync()来实现播放notification铃声、震动、闪烁灯功能。

启动AudioService服务过程,
1 | /android/frameworks/base/services/java/com/android/server/SystemServer.java |
启动SystemUI的RingtonePlayer服务过程,
1 | /android/frameworks/base/packages/SystemUI/src/com/android/systemui/SystemUIApplication.java |
RingtonePlayer是运行在SystemUI进程的服务,RingtonePlayer服务会获取AudioService服务对象,并把IRingtonePlayer对象传给AudioService服务对象中去,其它模块通过AudioService.getRingtonePlayer()来控制RingtonePlayer服务播放提示音的功能。
1 | private IRingtonePlayer mCallback = new IRingtonePlayer.Stub() { |
如果需要调用异步方式来播放提示音,就需要用到NotificationPlayer这个类,它会把播放任务保存到队列中,通过线程一个一个为队列中每个提示音播放任务创建一个播放线程并执行。
1 | /android/frameworks/base/packages/SystemUI/src/com/android/systemui/media/NotificationPlayer.java |
应用或者服务通过NotificationManager调用notify()发出通过,NotificationManager通过和NotificationManagerService服务通信,调用发出通知,并调用buzzBeepBlinkLocked()方法来触发通知提示音、震动或者led闪烁。
1 | /android/frameworks/base/core/java/android/app/NotificationManager.java |
NotificationManagerService服务中就是通过AudioService服务获取IRingtonePlayer对象来控制SystemUI进程进行播放提示音的,
final IRingtonePlayer player = mAudioManager.getRingtonePlayer();
player.playAsync(soundUri, record.sbn.getUser(), looping, audioAttributes);
SystemUI进程播放提示音的流程如下:
1 | /android/frameworks/base/packages/SystemUI/src/com/android/systemui/media/RingtonePlayer.java |
要理解Notification框架的原理,需要理清NotificationManager和NotificationManagerService之间是怎么通信的,NotificationManagerService和SystemUI之间是怎么通信的。INotificationManager.Stub不仅作为NotificationManagerService和NotificationManager的远程通信方式,也是NotificationManagerService和SystemUI的远程通信方式,不过SystemUI进程会创建和启动一个系统服务NotificationListenerService,这个系统服务通过INotificationManager.Stub把INotificationListener.Stub对象远程传给NotificationListenerService服务中,让NotificationListenerService服务通过INotificationListener.Stub对象和系统服务NotificationListenerService通信,系统服务NotificationListenerService再调用SystemUI进程来更新UI。

意图:
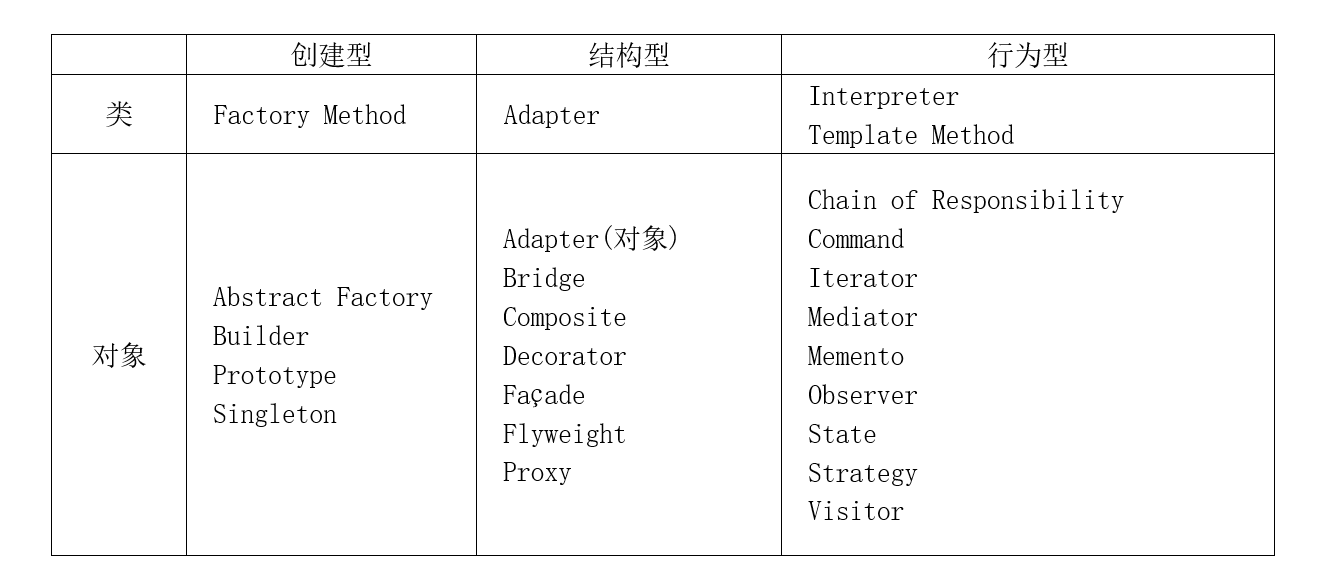
提供一个创建一系列相关或相互依赖对象的接口,而无需指定它们具体的类。
适用性:
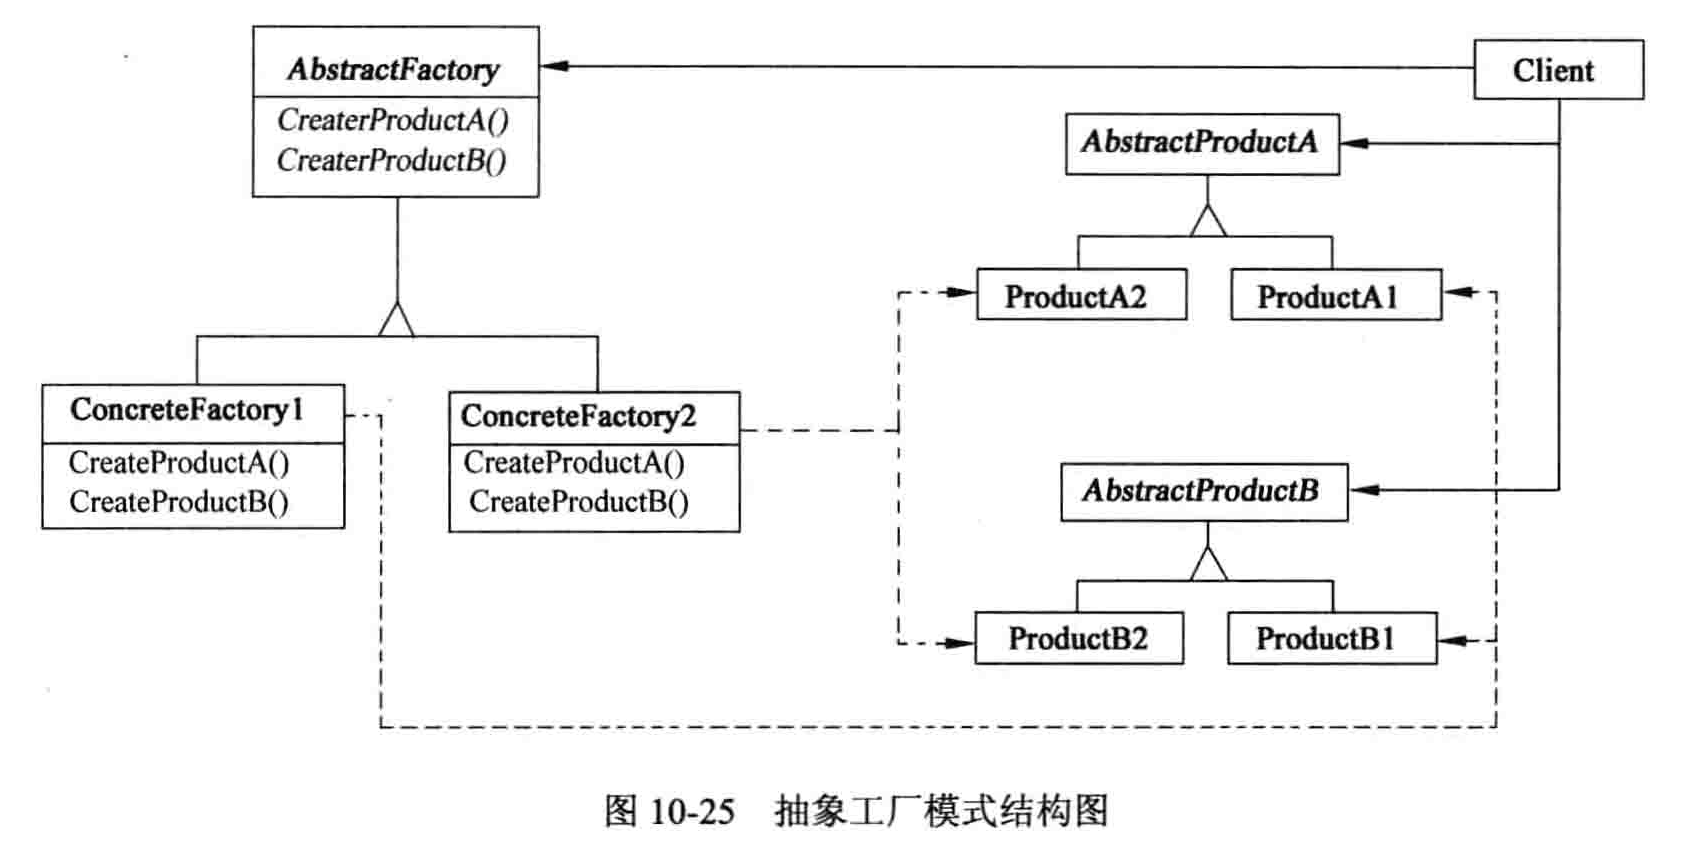
意图:
将一个复杂对象的构建与它的表示分离,使得同样的构建过程可以创建不同的表示。
适用性:
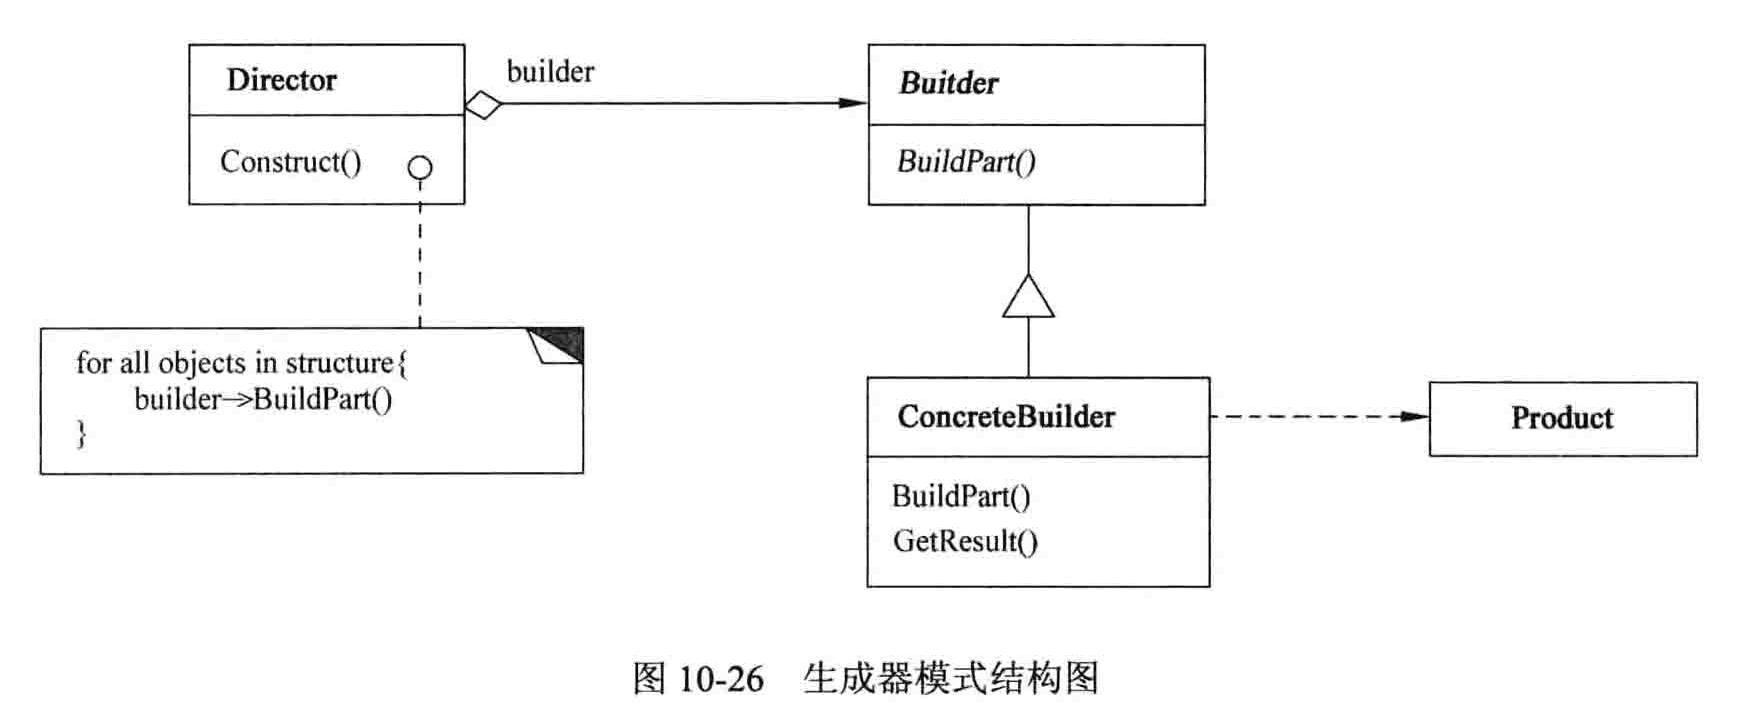
意图:
定义一个用于创建对象的接口,让子类决定实例化哪一个类。Factory Method 使一个类的实例化延迟到其子类。
适用性:
意图:
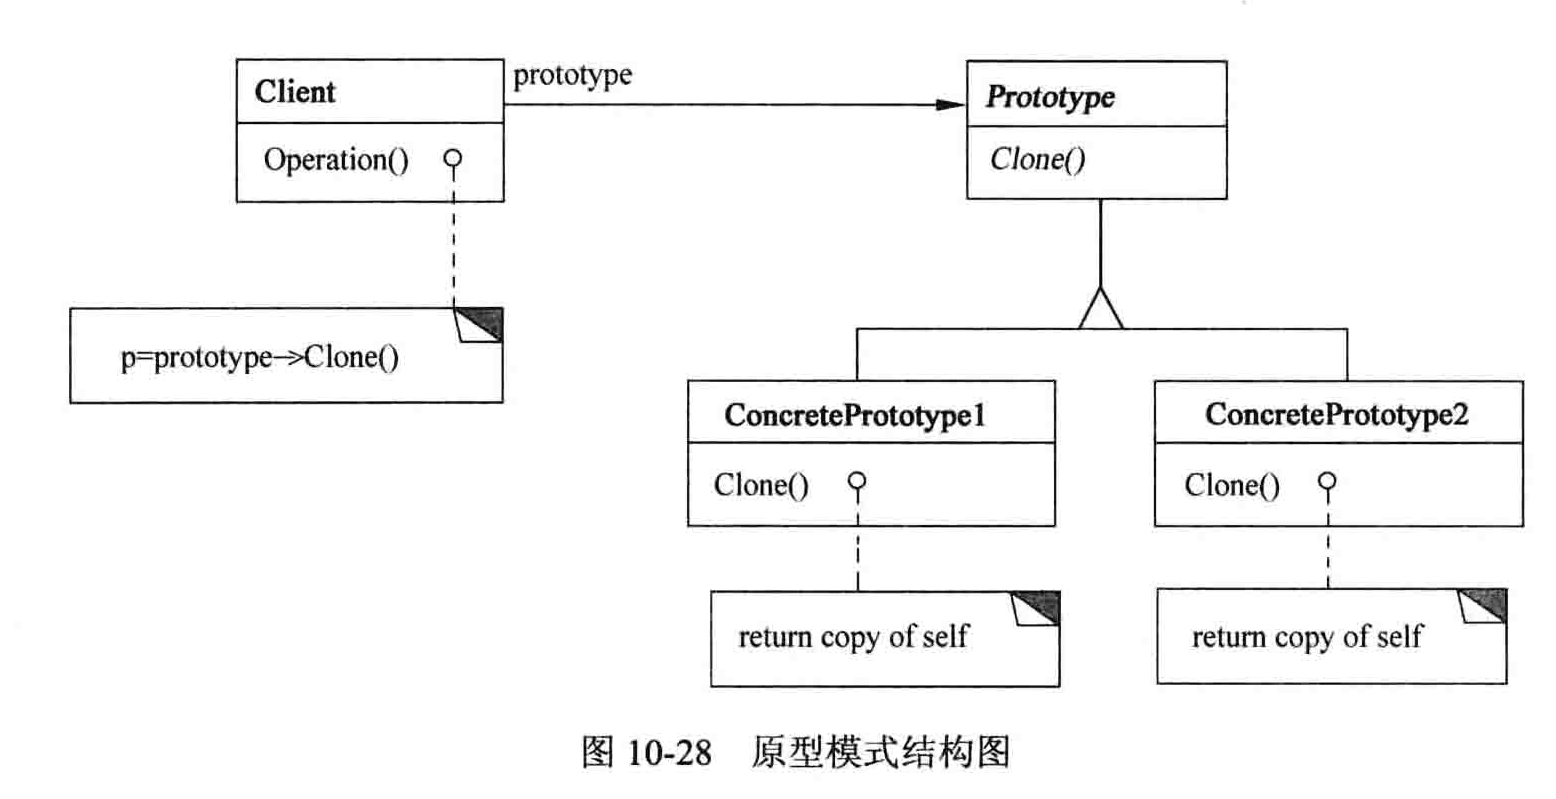
用原型实例指定创建对象的种类,并且通过拷贝这些原型创建新的对象。
适用性:
意图:
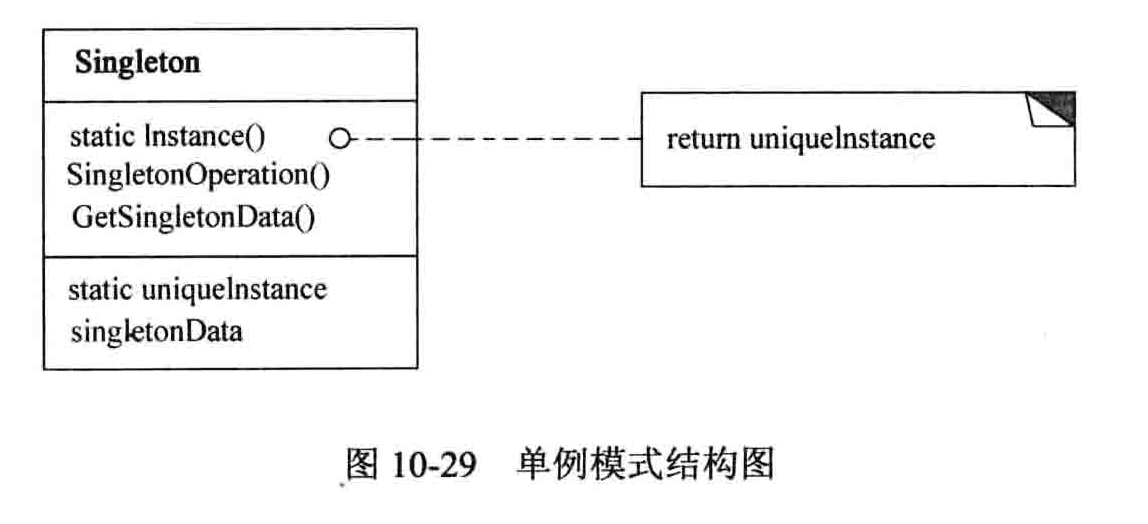
保证一个类仅有一个实例,并提供一个访问它的全局访问点。
适用性:
意图:
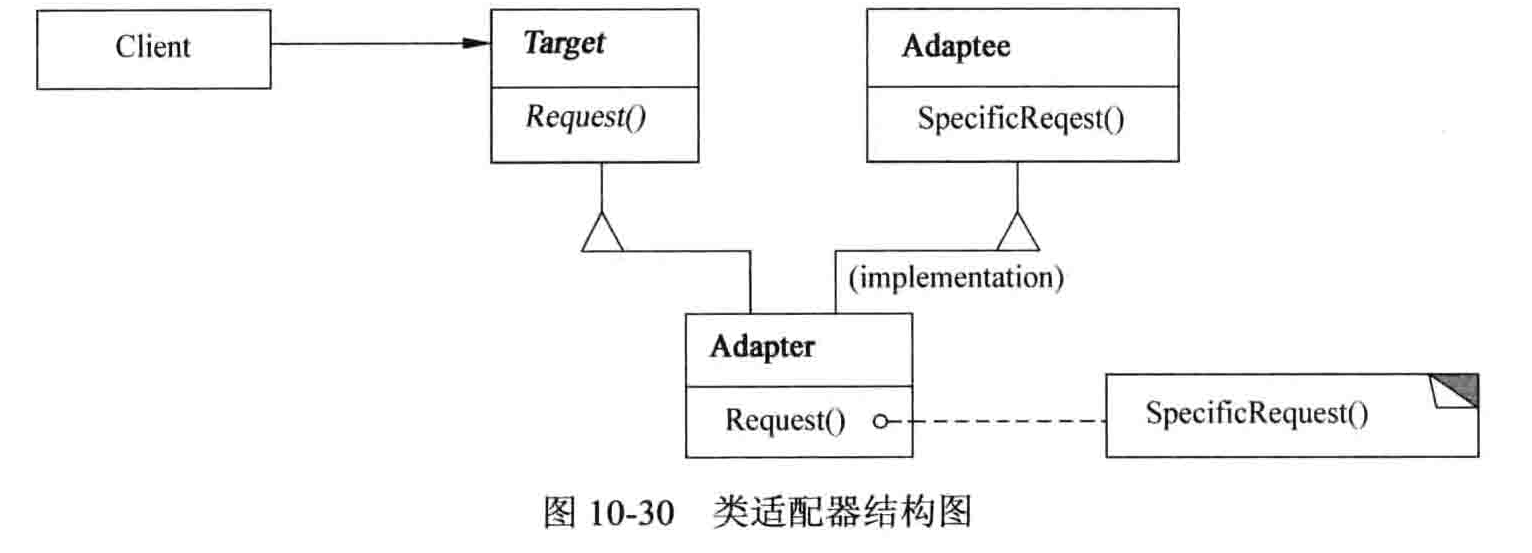
将一个类的接口转换成客户希望的另外一个接口。Adapter 模式使得原本由于接口不兼容而不能一起工作的那些类可以一起工作。
适用性:
意图:
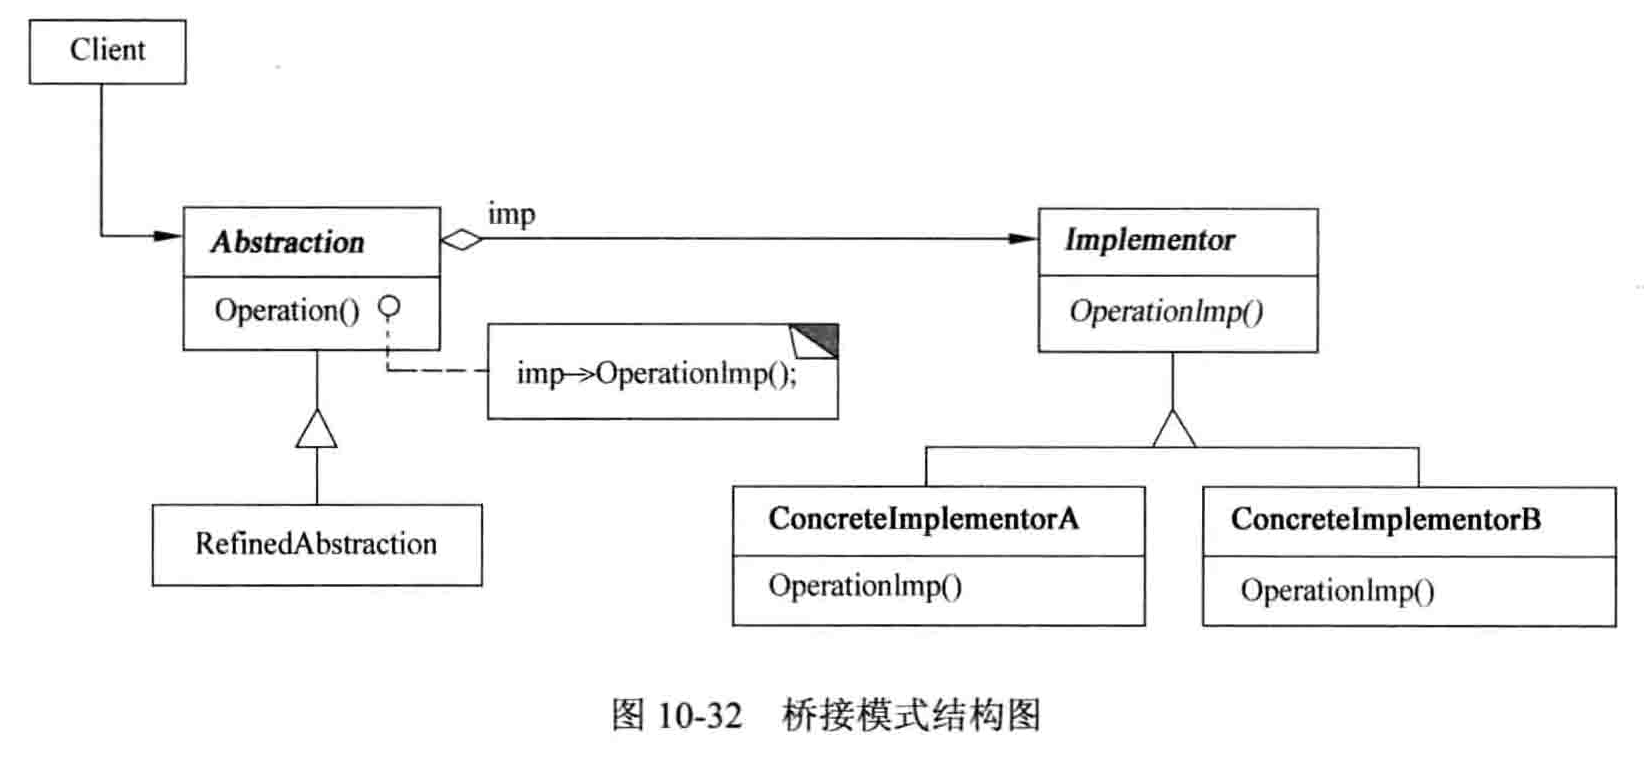
将抽象部分与它的实现部分分离,使它们都可以独立地变化。
适用性:
意图:
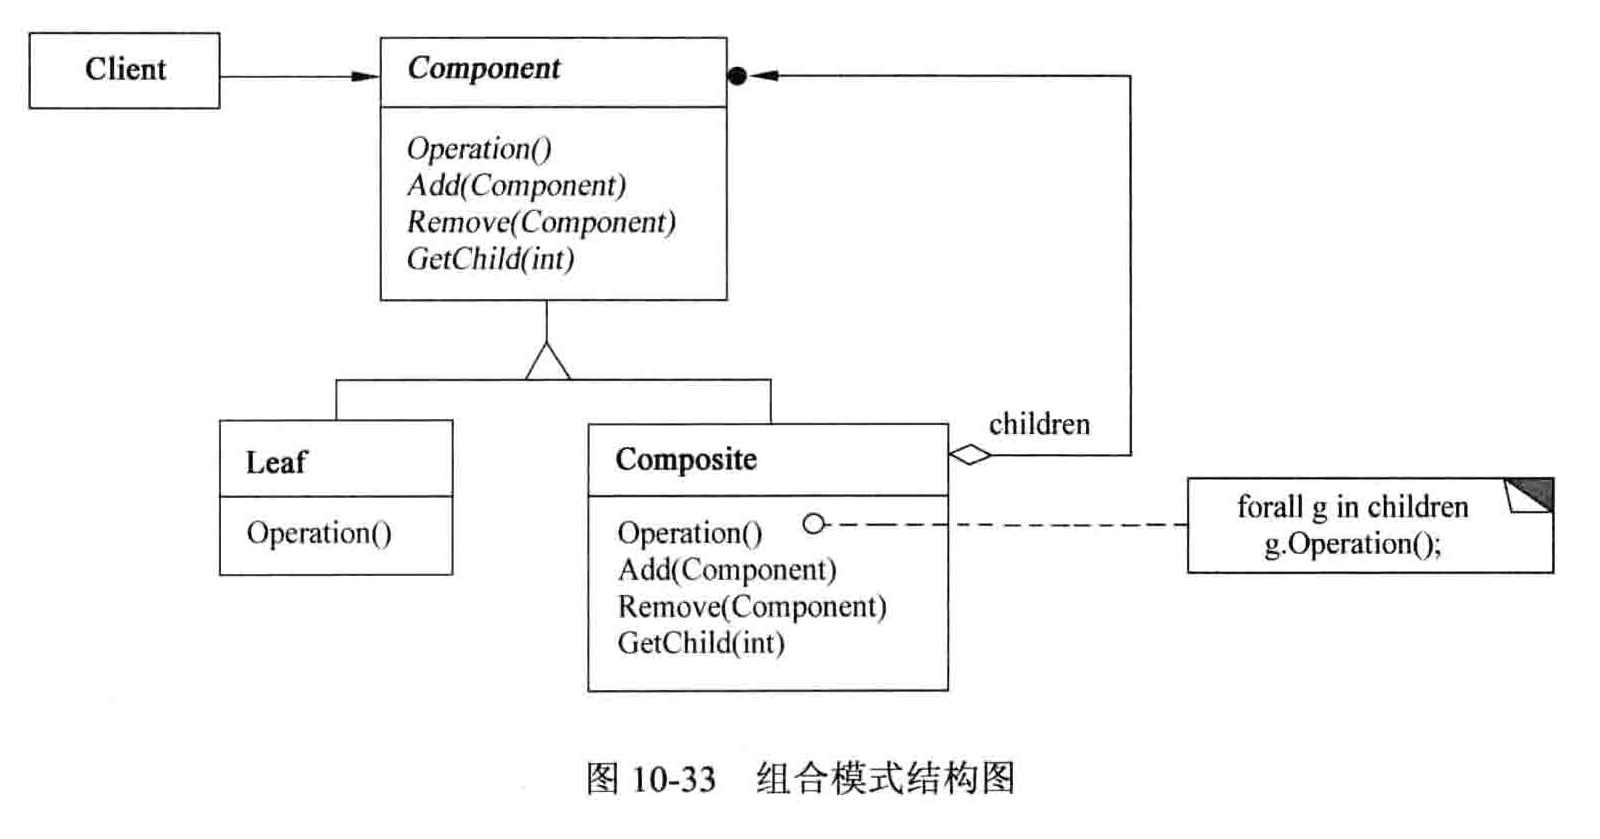
将对象组合成树形结构以表示“部分-整体”的层次结构。C o m p o s i t e 使得用户对单个对象和组合对象的使用具有一致性。
适用性:
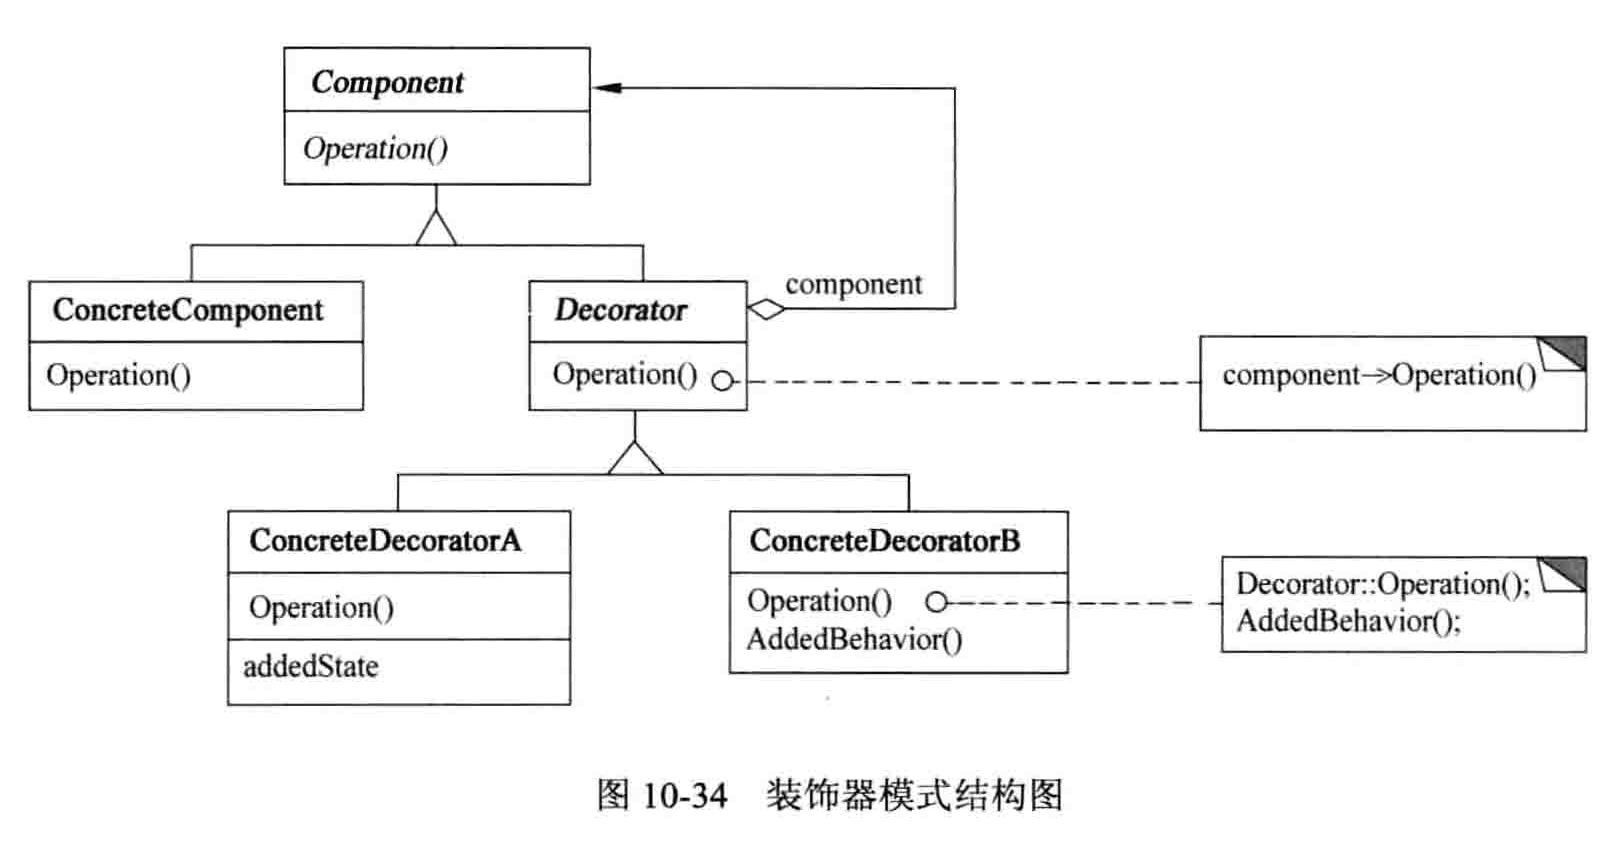
意图:
动态地给一个对象添加一些额外的职责。就增加功能来说,Decorator 模式相比生成子类更为灵活。
适用性:
意图:
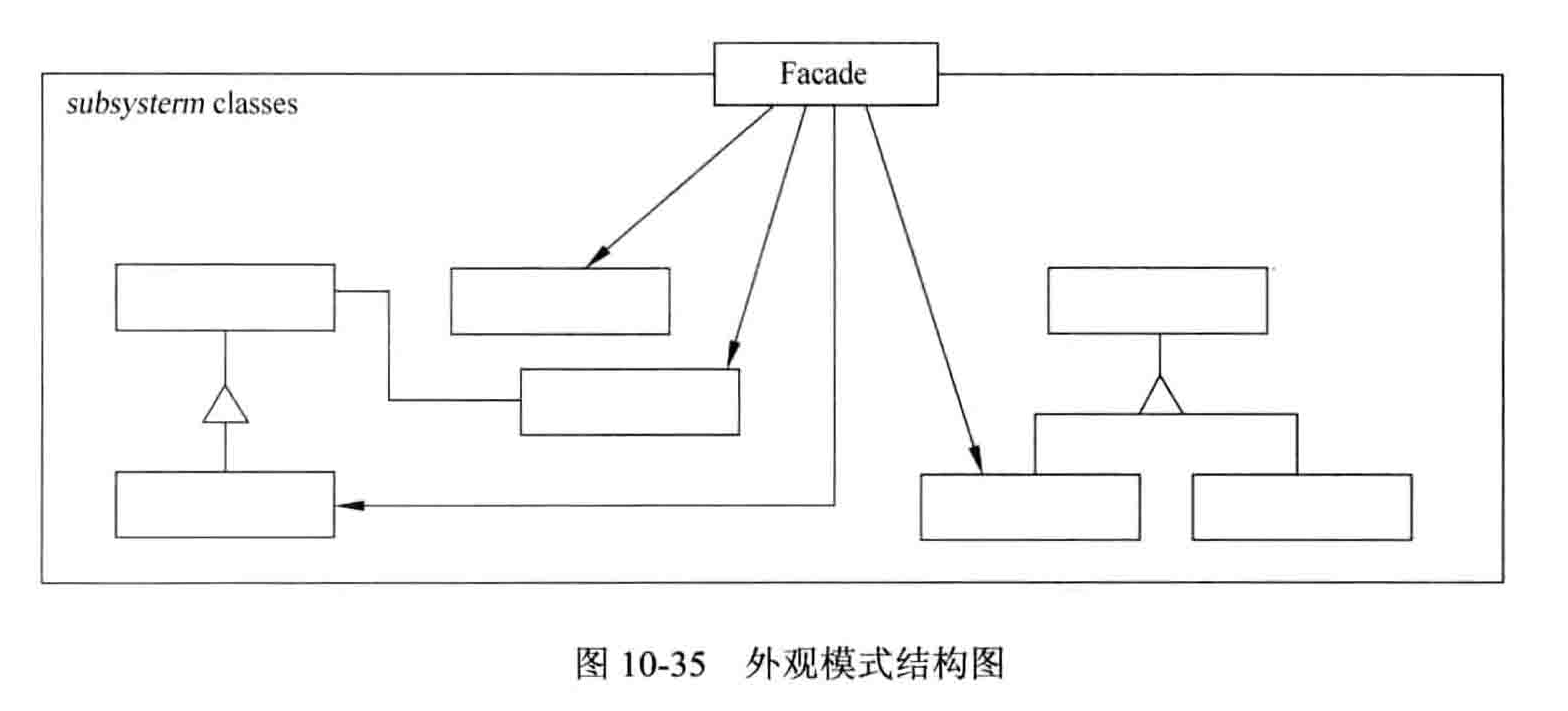
为子系统中的一组接口提供一个一致的界面,Facade模式定义了一个高层接口,这个接口使得这一子系统更加容易使用。
适用性:
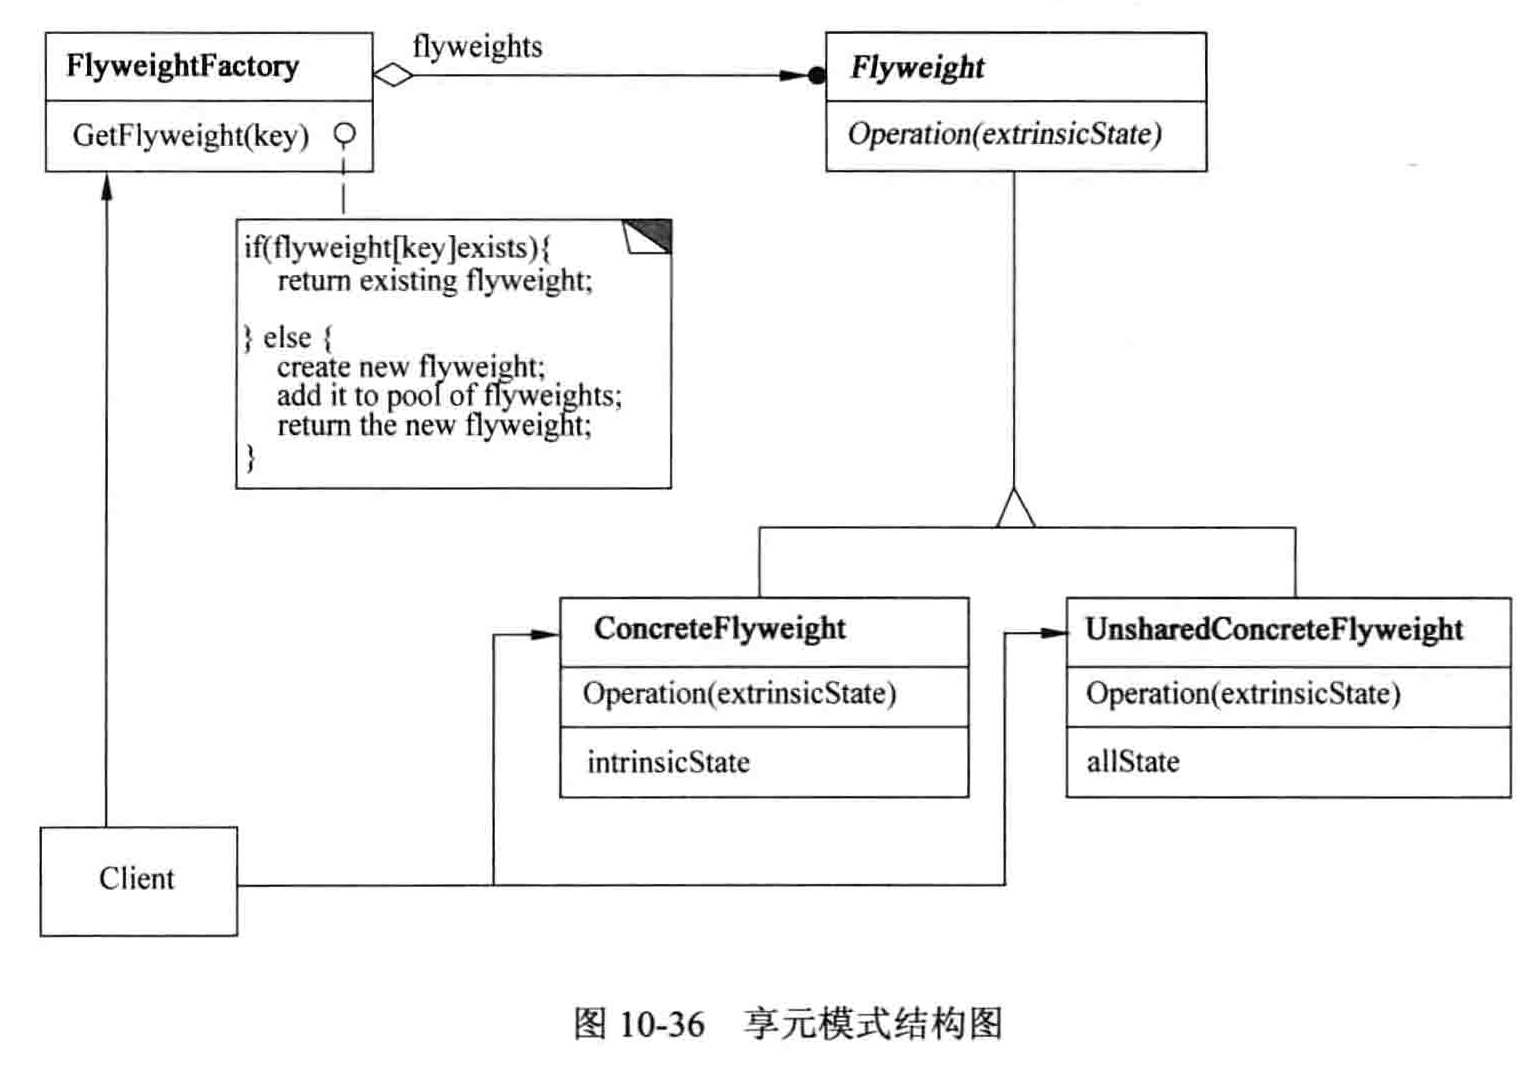
意图:
运用共享技术有效地支持大量细粒度的对象。
适用性:
意图:
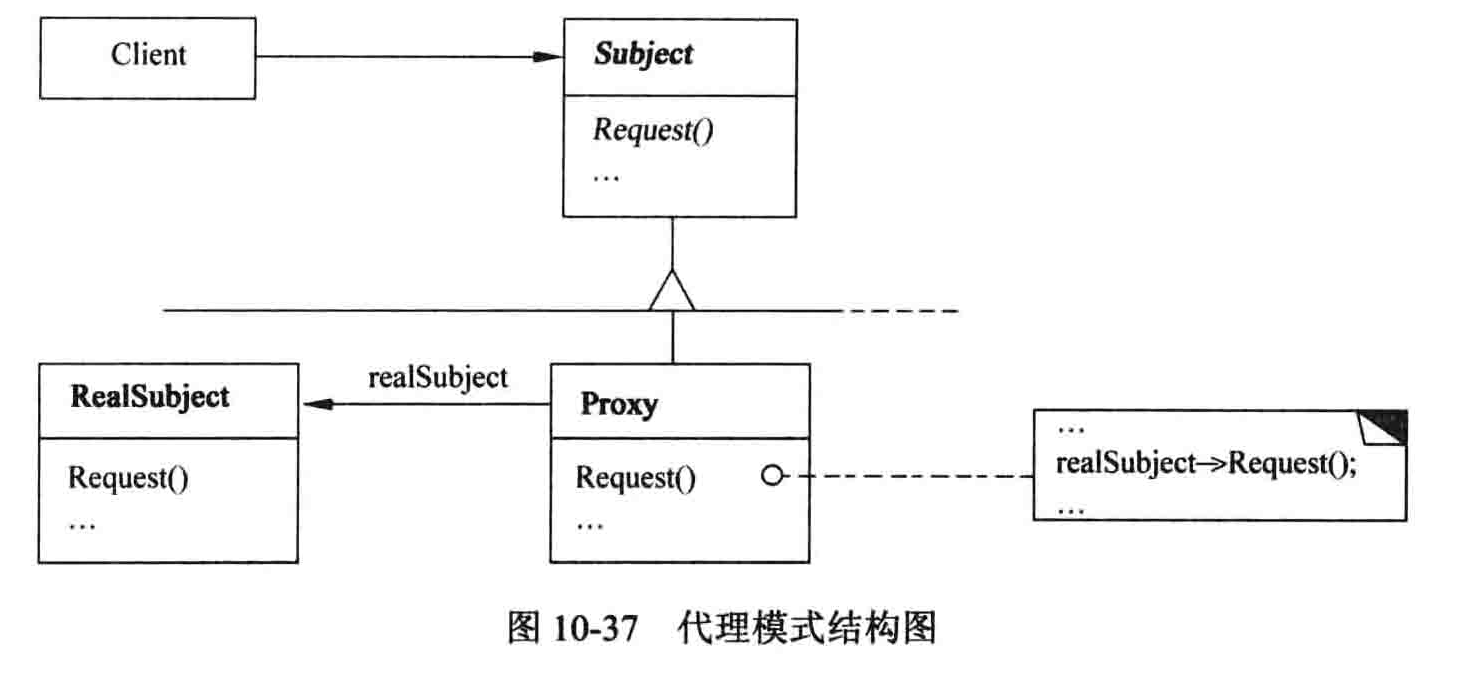
为其他对象提供一种代理以控制对这个对象的访问。
适用性:
在需要用比较通用和复杂的对象指针代替简单的指针的时候,使用Proxy模式。下面是一 些可以使用Proxy 模式常见情况:
意图:
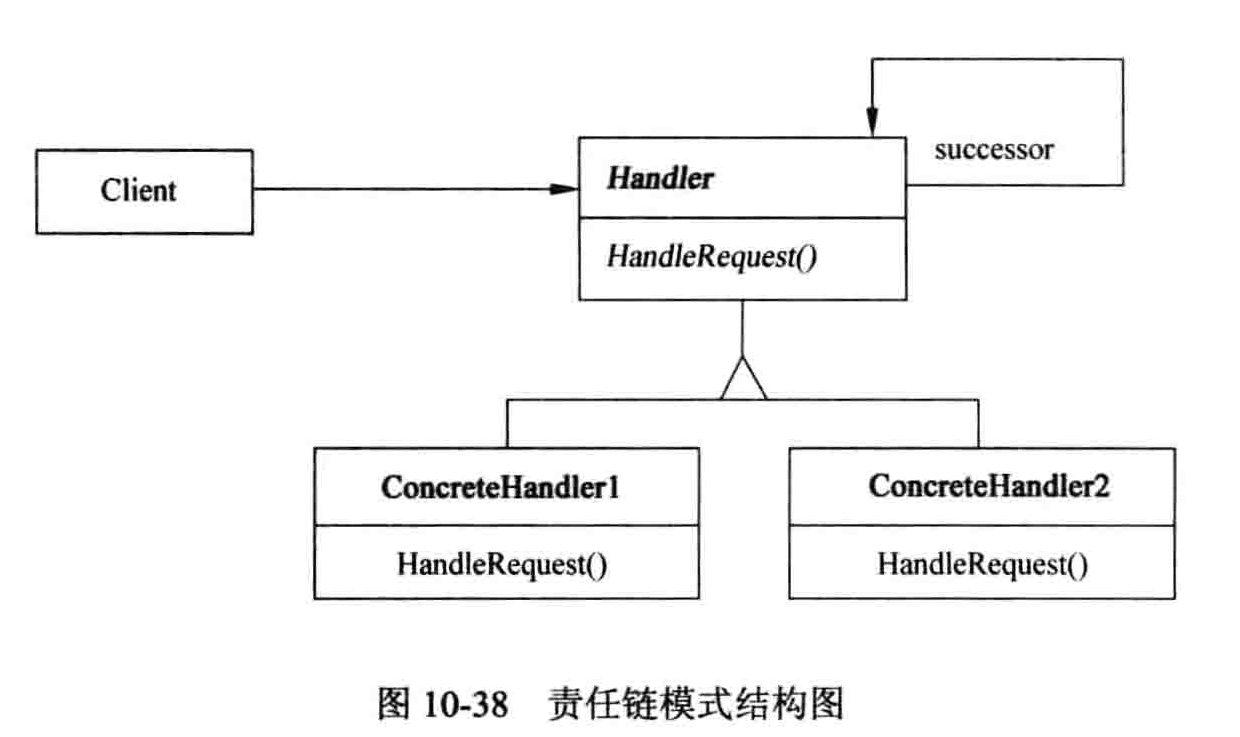
使多个对象都有机会处理请求,从而避免请求的发送者和接收者之间的耦合关系。将这些对象连成一条链,并沿着这条链传递该请求,直到有一个对象处理它为止。
适用性:
意图:
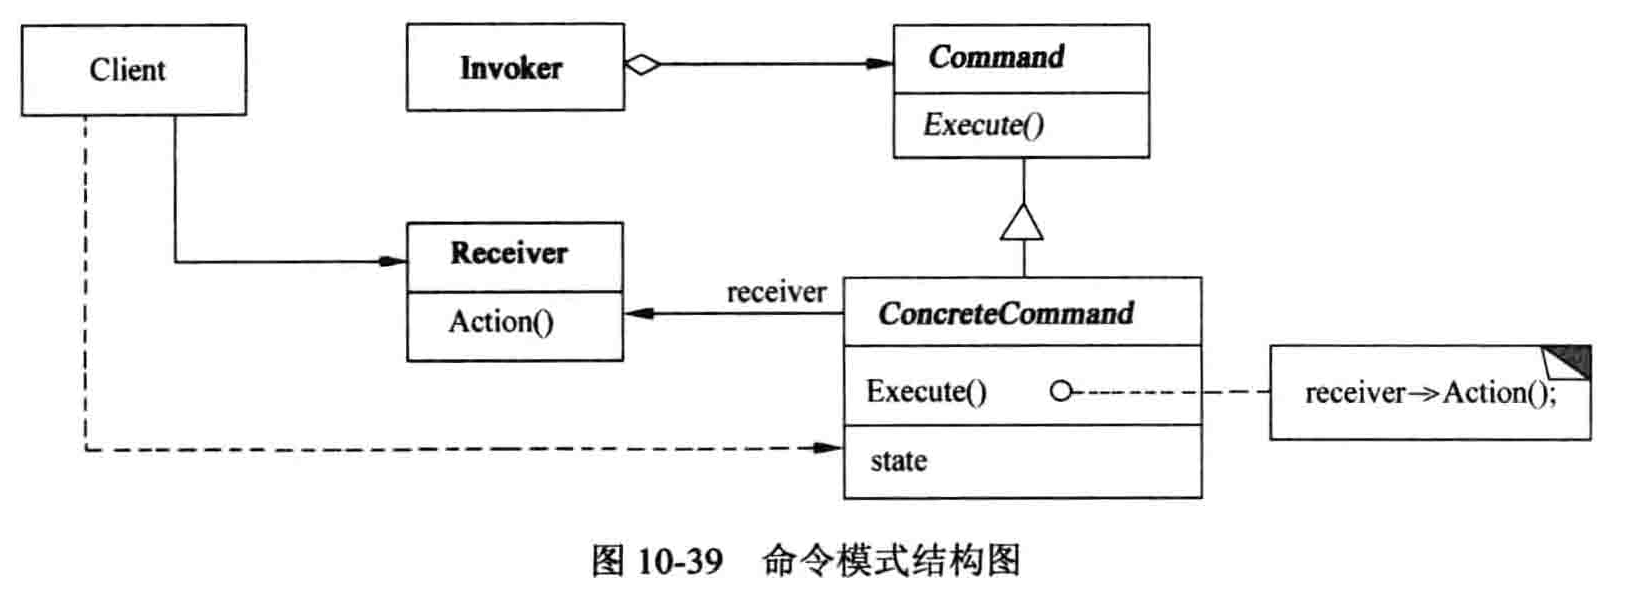
将一个请求封装为一个对象,从而使你可用不同的请求对客户进行参数化;对请求排队或记录请求日志,以及支持可撤消的操作。
适用性:
意图:
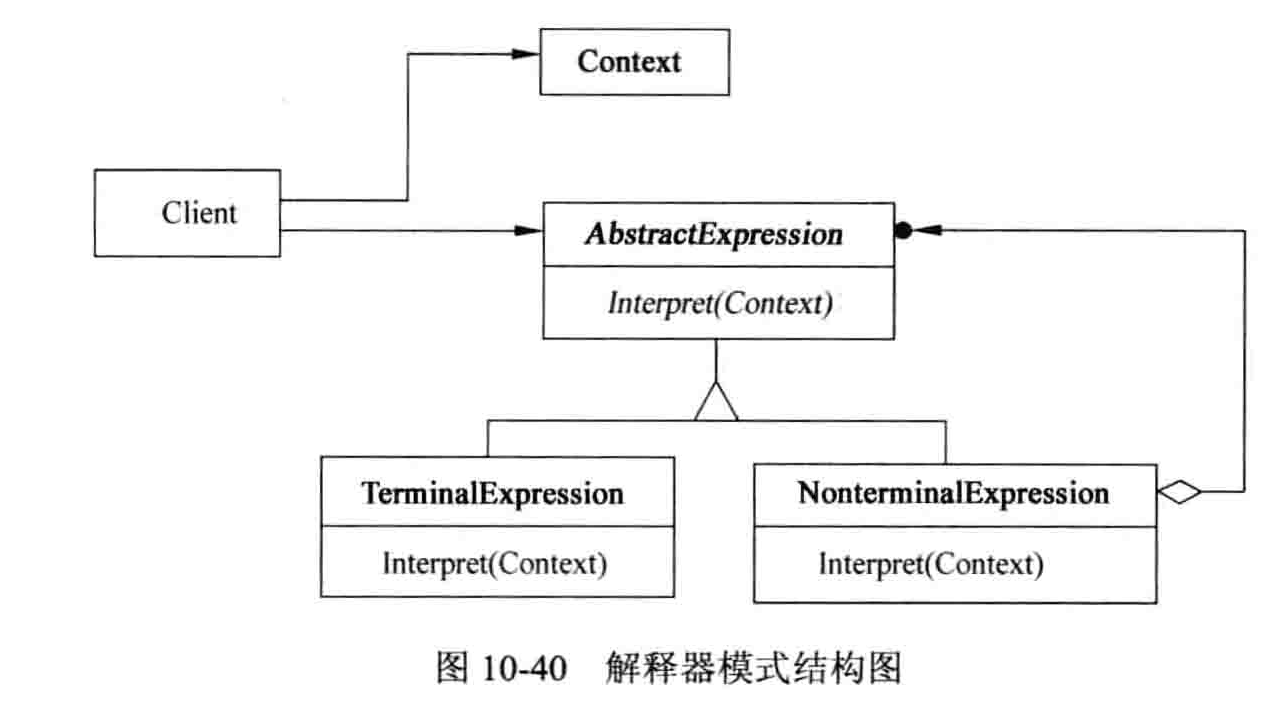
给定一个语言,定义它的文法的一种表示,并定义一个解释器,这个解释器使用该表示来解释语言中的句子。
适用性:
当有一个语言需要解释执行, 并且你可将该语言中的句子表示为一个抽象语法树时,可使用解释器模式。而当存在以下情况时该模式效果最好:
意图:
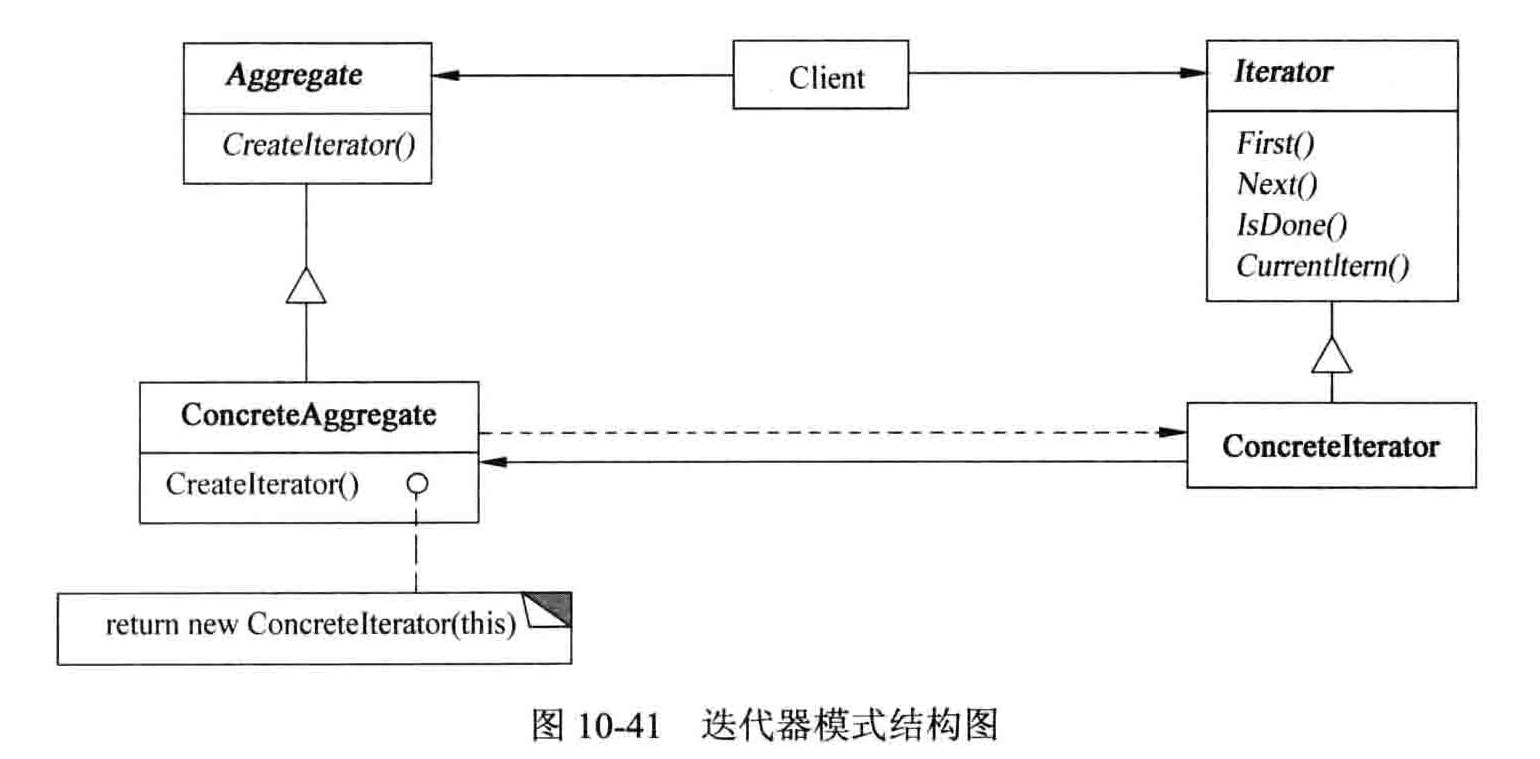
提供一种方法顺序访问一个聚合对象中各个元素, 而又不需暴露该对象的内部表示。
适用性:
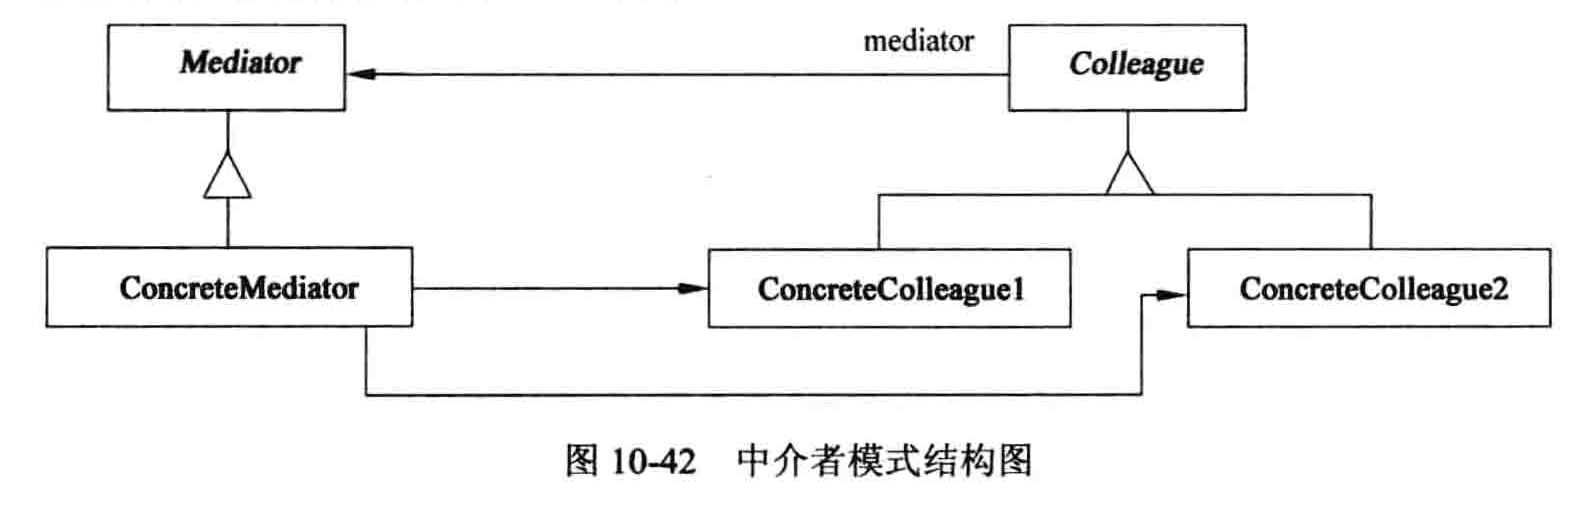
意图:
用一个中介对象来封装一系列的对象交互。中介者使各对象不需要显式地相互引用,从而使其耦合松散,而且可以独立地改变它们之间的交互。
适用性:
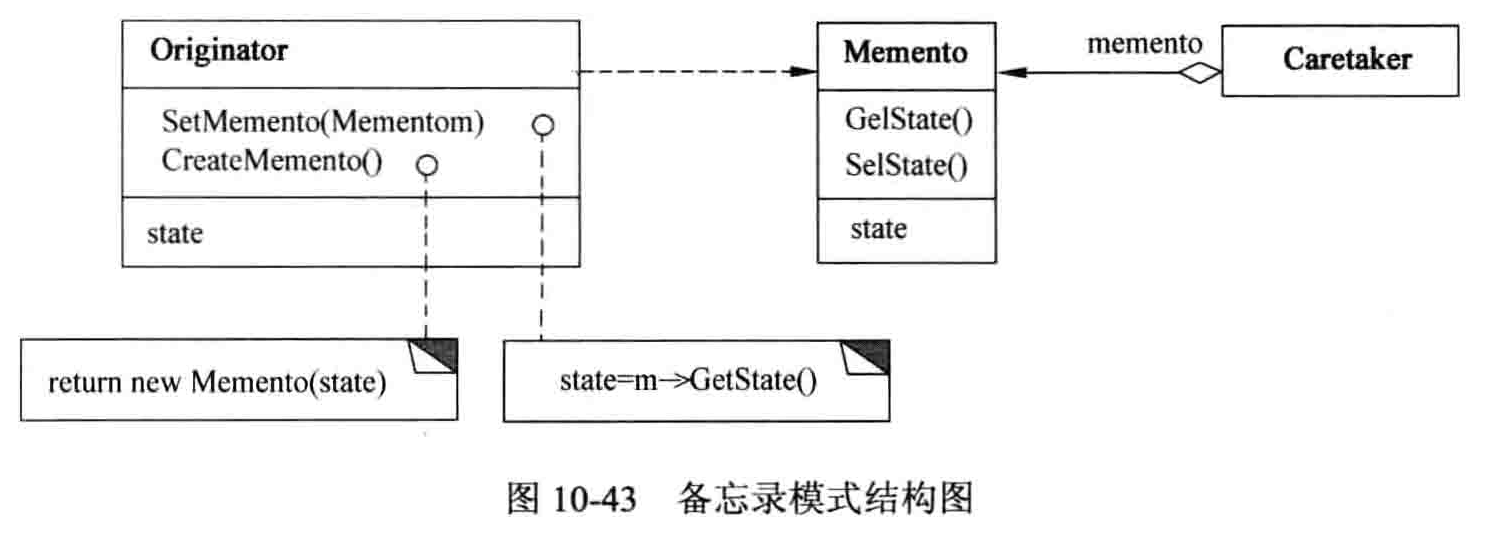
意图:
在不破坏封装性的前提下,捕获一个对象的内部状态,并在该对象之外保存这个状态。这样以后就可将该对象恢复到原先保存的状态。
适用性:
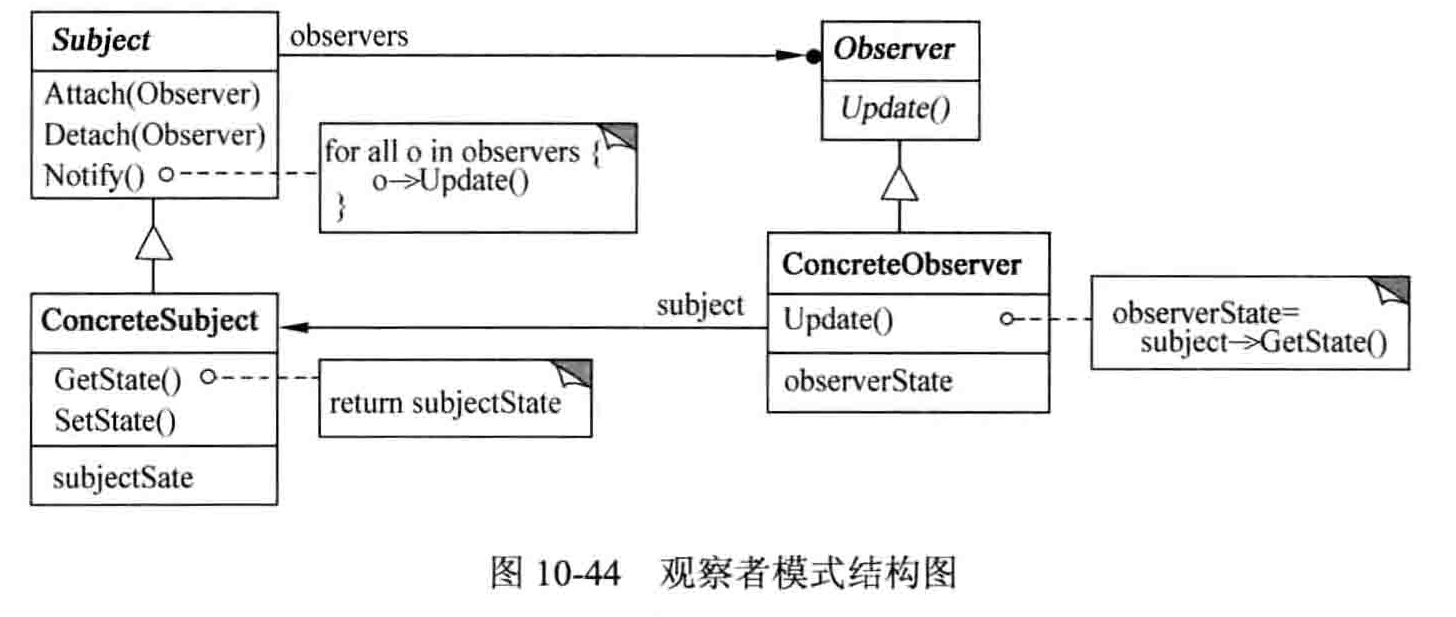
意图:
定义对象间的一种一对多的依赖关系,当一个对象的状态发生改变时, 所有依赖于它的对象都得到通知并被自动更新。
适用性:
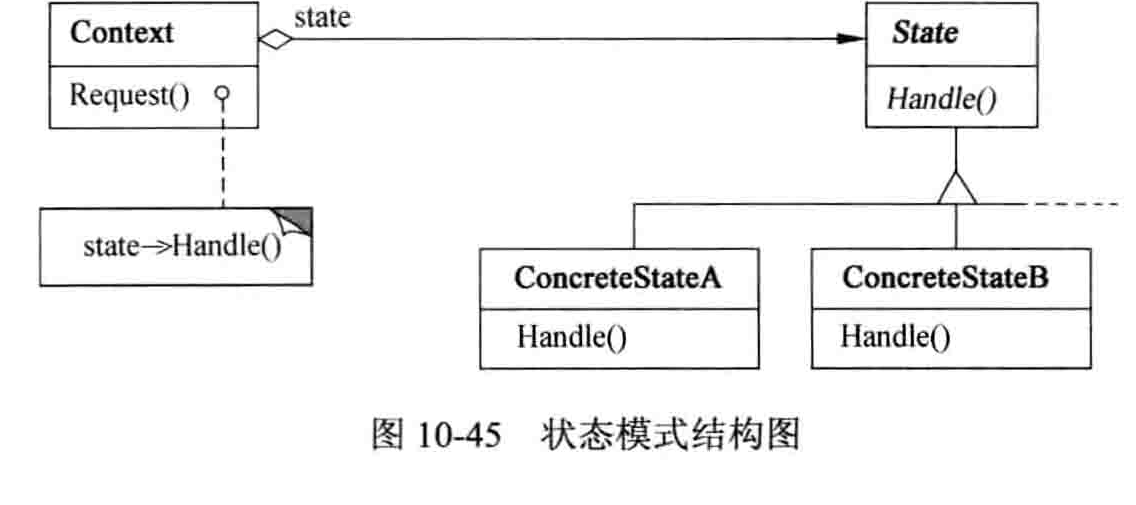
意图:
允许一个对象在其内部状态改变时改变它的行为。对象看起来似乎修改了它的类。
适用性:
意图:
定义一系列的算法,把它们一个个封装起来, 并且使它们可相互替换。本模式使得算法可独立于使用它的客户而变化。
适用性:

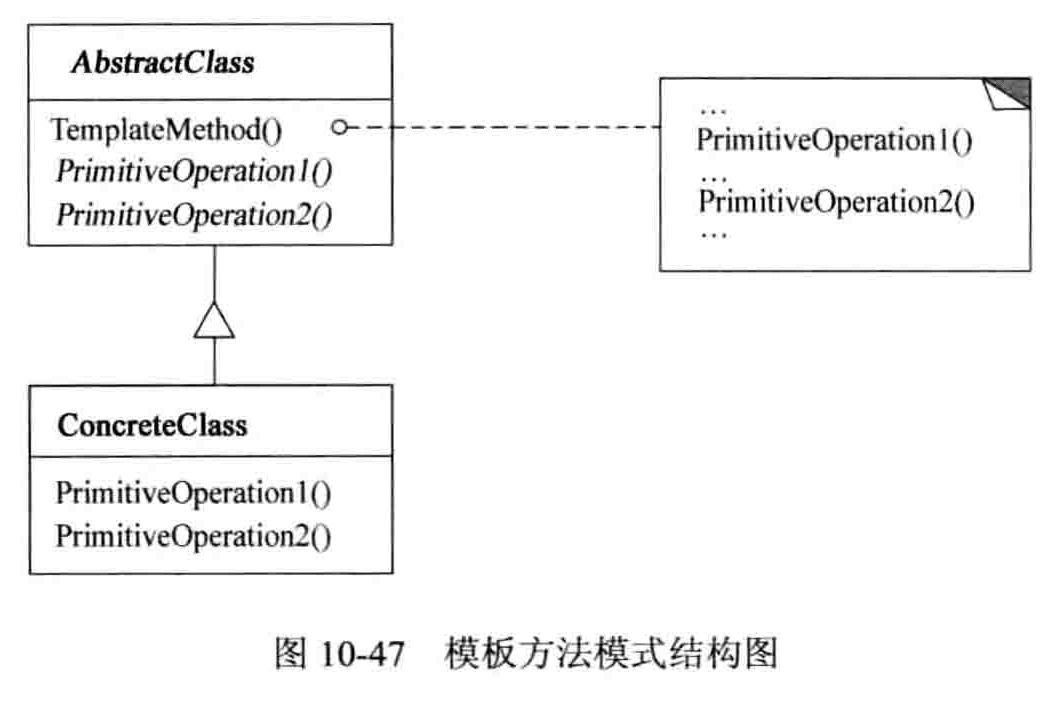
意图:
定义一个操作中的算法的骨架,而将一些步骤延迟到子类中。TemplateMethod 使得子类可以不改变一个算法的结构即可重定义该算法的某些特定步骤。
适用性:
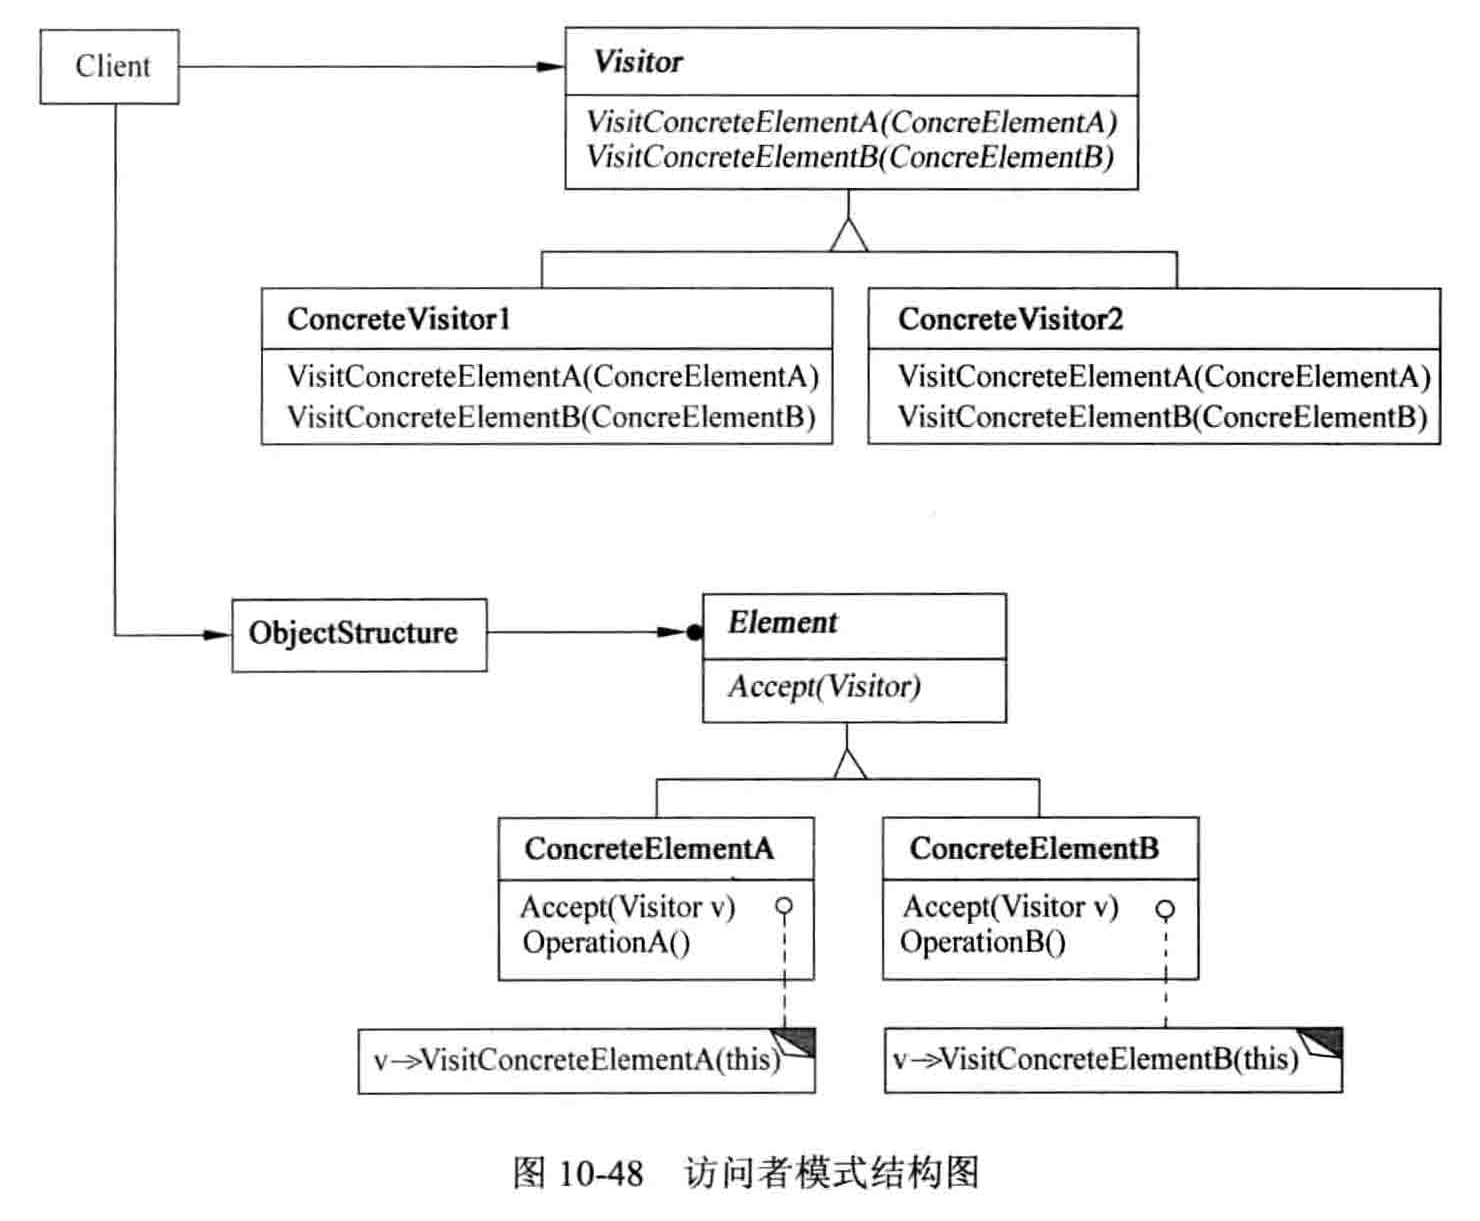
意图:
表示一个作用于某对象结构中的各元素的操作。它允许在不改变歌元素的类的前提下定义作用于这些元素的新操作。
适用性:
对于面向对象软件系统的设计而言,在支持可维护性的同时,提高系统的可复用性是一个至关重要的问题,如何同时提高一个软件系统的可维护性和可复用性是面向对象设计需要解决的核心问题之一。在面向对象设计中,可维护性的复用是以设计原则为基础的。每一个原则都蕴含一些面向对象设计的思想,可以从不同的角度提升一个软件结构的设计水平。
面向对象设计原则为支持可维护性复用而诞生,这些原则蕴含在很多设计模式中,它们是从许多设计方案中总结出的指导性原则。面向对象设计原则也是我们用于评价一个设计模式的使用效果的重要指标之一,在设计模式的学习中,大家经常会看到诸如“XXX模式符合XXX原则”、“XXX模式违反了XXX原则”这样的语句。
最常见的7种面向对象设计原则如下表所示:

单一职责原则是最简单的面向对象设计原则,它用于控制类的粒度大小。单一职责原则定义如下:
单一职责原则(Single Responsibility Principle, SRP):一个类只负责一个功能领域中的相应职责,或者可以定义为:就一个类而言,应该只有一个引起它变化的原因。
单一职责原则告诉我们:一个类不能太“累”!在软件系统中,一个类(大到模块,小到方法)承担的职责越多,它被复用的可能性就越小,而且一个类承担的职责过多,就相当于将这些职责耦合在一起,当其中一个职责变化时,可能会影响其他职责的运作,因此要将这些职责进行分离,将不同的职责封装在不同的类中,即将不同的变化原因封装在不同的类中,如果多个职责总是同时发生改变则可将它们封装在同一类中。
单一职责原则是实现高内聚、低耦合的指导方针,它是最简单但又最难运用的原则,需要设计人员发现类的不同职责并将其分离,而发现类的多重职责需要设计人员具有较强的分析设计能力和相关实践经验。
开闭原则是面向对象的可复用设计的第一块基石,它是最重要的面向对象设计原则。开闭原则由Bertrand Meyer于1988年提出,其定义如下:
开闭原则(Open-Closed Principle, OCP):一个软件实体应当对扩展开放,对修改关闭。即软件实体应尽量在不修改原有代码的情况下进行扩展。
在开闭原则的定义中,软件实体可以指一个软件模块、一个由多个类组成的局部结构或一个独立的类。
任何软件都需要面临一个很重要的问题,即它们的需求会随时间的推移而发生变化。当软件系统需要面对新的需求时,我们应该尽量保证系统的设计框架是稳定的。如果一个软件设计符合开闭原则,那么可以非常方便地对系统进行扩展,而且在扩展时无须修改现有代码,使得软件系统在拥有适应性和灵活性的同时具备较好的稳定性和延续性。随着软件规模越来越大,软件寿命越来越长,软件维护成本越来越高,设计满足开闭原则的软件系统也变得越来越重要。
为了满足开闭原则,需要对系统进行抽象化设计,抽象化是开闭原则的关键。在Java、C#等编程语言中,可以为系统定义一个相对稳定的抽象层,而将不同的实现行为移至具体的实现层中完成。在很多面向对象编程语言中都提供了接口、抽象类等机制,可以通过它们定义系统的抽象层,再通过具体类来进行扩展。如果需要修改系统的行为,无须对抽象层进行任何改动,只需要增加新的具体类来实现新的业务功能即可,实现在不修改已有代码的基础上扩展系统的功能,达到开闭原则的要求。
里氏代换原则由2008年图灵奖得主、美国第一位计算机科学女博士Barbara Liskov教授和卡内基·梅隆大学Jeannette Wing教授于1994年提出。其严格表述如下:如果对每一个类型为S的对象o1,都有类型为T的对象o2,使得以T定义的所有程序P在所有的对象o1代换o2时,程序P的行为没有变化,那么类型S是类型T的子类型。这个定义比较拗口且难以理解,因此我们一般使用它的另一个通俗版定义:
里氏代换原则(Liskov Substitution Principle, LSP):所有引用基类(父类)的地方必须能透明地使用其子类的对象。
里氏代换原则告诉我们,在软件中将一个基类对象替换成它的子类对象,程序将不会产生任何错误和异常,反过来则不成立,如果一个软件实体使用的是一个子类对象的话,那么它不一定能够使用基类对象。例如:我喜欢动物,那我一定喜欢狗,因为狗是动物的子类;但是我喜欢狗,不能据此断定我喜欢动物,因为我并不喜欢老鼠,虽然它也是动物。
例如有两个类,一个类为BaseClass,另一个是SubClass类,并且SubClass类是BaseClass类的子类,那么一个方法如果可以接受一个BaseClass类型的基类对象base的话,如:method1(base),那么它必然可以接受一个BaseClass类型的子类对象sub,method1(sub)能够正常运行。反过来的代换不成立,如一个方法method2接受BaseClass类型的子类对象sub为参数:method2(sub),那么一般而言不可以有method2(base),除非是重载方法。
里氏代换原则是实现开闭原则的重要方式之一,由于使用基类对象的地方都可以使用子类对象,因此在程序中尽量使用基类类型来对对象进行定义,而在运行时再确定其子类类型,用子类对象来替换父类对象。
在使用里氏代换原则时需要注意如下几个问题:
子类的所有方法必须在父类中声明,或子类必须实现父类中声明的所有方法。根据里氏代换原则,为了保证系统的扩展性,在程序中通常使用父类来进行定义,如果一个方法只存在子类中,在父类中不提供相应的声明,则无法在以父类定义的对象中使用该方法。
我们在运用里氏代换原则时,尽量把父类设计为抽象类或者接口,让子类继承父类或实现父接口,并实现在父类中声明的方法,运行时,子类实例替换父类实例,我们可以很方便地扩展系统的功能,同时无须修改原有子类的代码,增加新的功能可以通过增加一个新的子类来实现。里氏代换原则是开闭原则的具体实现手段之一。
Java语言中,在编译阶段,Java编译器会检查一个程序是否符合里氏代换原则,这是一个与实现无关的、纯语法意义上的检查,但Java编译器的检查是有局限的。
如果说开闭原则是面向对象设计的目标的话,那么依赖倒转原则就是面向对象设计的主要实现机制之一,它是系统抽象化的具体实现。依赖倒转原则是Robert C. Martin在1996年为“C++Reporter”所写的专栏Engineering Notebook的第三篇,后来加入到他在2002年出版的经典著作“Agile Software Development, Principles, Patterns, and Practices”一书中。依赖倒转原则定义如下:
依赖倒转原则(Dependency Inversion Principle, DIP):抽象不应该依赖于细节,细节应当依赖于抽象。换言之,要针对接口编程,而不是针对实现编程。
依赖倒转原则要求我们在程序代码中传递参数时或在关联关系中,尽量引用层次高的抽象层类,即使用接口和抽象类进行变量类型声明、参数类型声明、方法返回类型声明,以及数据类型的转换等,而不要用具体类来做这些事情。为了确保该原则的应用,一个具体类应当只实现接口或抽象类中声明过的方法,而不要给出多余的方法,否则将无法调用到在子类中增加的新方法。
在引入抽象层后,系统将具有很好的灵活性,在程序中尽量使用抽象层进行编程,而将具体类写在配置文件中,这样一来,如果系统行为发生变化,只需要对抽象层进行扩展,并修改配置文件,而无须修改原有系统的源代码,在不修改的情况下来扩展系统的功能,满足开闭原则的要求。
在实现依赖倒转原则时,我们需要针对抽象层编程,而将具体类的对象通过依赖注入(DependencyInjection, DI)的方式注入到其他对象中,依赖注入是指当一个对象要与其他对象发生依赖关系时,通过抽象来注入所依赖的对象。常用的注入方式有三种,分别是:构造注入,设值注入(Setter注入)和接口注入。构造注入是指通过构造函数来传入具体类的对象,设值注入是指通过Setter方法来传入具体类的对象,而接口注入是指通过在接口中声明的业务方法来传入具体类的对象。这些方法在定义时使用的是抽象类型,在运行时再传入具体类型的对象,由子类对象来覆盖父类对象。
扩展
软件工程大师Martin Fowler在其文章Inversion of Control Containers and the Dependency Injection pattern中对依赖注入进行了深入的分析,参考链接:
http://martinfowler.com/articles/injection.html
接口隔离原则定义如下:
接口隔离原则(Interface Segregation Principle, ISP):使用多个专门的接口,而不使用单一的总接口,即客户端不应该依赖那些它不需要的接口。
根据接口隔离原则,当一个接口太大时,我们需要将它分割成一些更细小的接口,使用该接口的客户端仅需知道与之相关的方法即可。每一个接口应该承担一种相对独立的角色,不干不该干的事,该干的事都要干。这里的“接口”往往有两种不同的含义:一种是指一个类型所具有的方法特征的集合,仅仅是一种逻辑上的抽象;另外一种是指某种语言具体的“接口”定义,有严格的定义和结构,比如Java语言中的interface。对于这两种不同的含义,ISP的表达方式以及含义都有所不同:
当把“接口”理解成一个类型所提供的所有方法特征的集合的时候,这就是一种逻辑上的概念,接口的划分将直接带来类型的划分。可以把接口理解成角色,一个接口只能代表一个角色,每个角色都有它特定的一个接口,此时,这个原则可以叫做“角色隔离原则”。
如果把“接口”理解成狭义的特定语言的接口,那么ISP表达的意思是指接口仅仅提供客户端需要的行为,客户端不需要的行为则隐藏起来,应当为客户端提供尽可能小的单独的接口,而不要提供大的总接口。在面向对象编程语言中,实现一个接口就需要实现该接口中定义的所有方法,因此大的总接口使用起来不一定很方便,为了使接口的职责单一,需要将大接口中的方法根据其职责不同分别放在不同的小接口中,以确保每个接口使用起来都较为方便,并都承担某一单一角色。接口应该尽量细化,同时接口中的方法应该尽量少,每个接口中只包含一个客户端(如子模块或业务逻辑类)所需的方法即可,这种机制也称为“定制服务”,即为不同的客户端提供宽窄不同的接口。
合成复用原则又称为组合/聚合复用原则(Composition/Aggregate Reuse Principle, CARP),其定义如下:
合成复用原则(Composite Reuse Principle, CRP):尽量使用对象组合,而不是继承来达到复用的目的。
合成复用原则就是在一个新的对象里通过关联关系(包括组合关系和聚合关系)来使用一些已有的对象,使之成为新对象的一部分;新对象通过委派调用已有对象的方法达到复用功能的目的。简言之:复用时要尽量使用组合/聚合关系(关联关系),少用继承。
在面向对象设计中,可以通过两种方法在不同的环境中复用已有的设计和实现,即通过组合/聚合关系或通过继承,但首先应该考虑使用组合/聚合,组合/聚合可以使系统更加灵活,降低类与类之间的耦合度,一个类的变化对其他类造成的影响相对较少;其次才考虑继承,在使用继承时,需要严格遵循里氏代换原则,有效使用继承会有助于对问题的理解,降低复杂度,而滥用继承反而会增加系统构建和维护的难度以及系统的复杂度,因此需要慎重使用继承复用。
通过继承来进行复用的主要问题在于继承复用会破坏系统的封装性,因为继承会将基类的实现细节暴露给子类,由于基类的内部细节通常对子类来说是可见的,所以这种复用又称“白箱”复用,如果基类发生改变,那么子类的实现也不得不发生改变;从基类继承而来的实现是静态的,不可能在运行时发生改变,没有足够的灵活性;而且继承只能在有限的环境中使用(如类没有声明为不能被继承)。
扩展
对于继承的深入理解,大家可以参考《软件架构设计》一书作者温昱先生的文章——《见山只是山见水只是水——提升对继承的认识》。
由于组合或聚合关系可以将已有的对象(也可称为成员对象)纳入到新对象中,使之成为新对象的一部分,因此新对象可以调用已有对象的功能,这样做可以使得成员对象的内部实现细节对于新对象不可见,所以这种复用又称为“黑箱”复用,相对继承关系而言,其耦合度相对较低,成员对象的变化对新对象的影响不大,可以在新对象中根据实际需要有选择性地调用成员对象的操作;合成复用可以在运行时动态进行,新对象可以动态地引用与成员对象类型相同的其他对象。
一般而言,如果两个类之间是“Has-A”的关系应使用组合或聚合,如果是“Is-A”关系可使用继承。”Is-A”是严格的分类学意义上的定义,意思是一个类是另一个类的”一种”;而”Has-A”则不同,它表示某一个角色具有某一项责任。
迪米特法则来自于1987年美国东北大学(Northeastern University)一个名为“Demeter”的研究项目。迪米特法则又称为最少知识原则(LeastKnowledge Principle, LKP),其定义如下:
迪米特法则(Law of Demeter, LoD):一个软件实体应当尽可能少地与其他实体发生相互作用。
如果一个系统符合迪米特法则,那么当其中某一个模块发生修改时,就会尽量少地影响其他模块,扩展会相对容易,这是对软件实体之间通信的限制,迪米特法则要求限制软件实体之间通信的宽度和深度。迪米特法则可降低系统的耦合度,使类与类之间保持松散的耦合关系。
迪米特法则还有几种定义形式,包括:不要和“陌生人”说话、只与你的直接朋友通信等,在迪米特法则中,对于一个对象,其朋友包括以下几类:
任何一个对象,如果满足上面的条件之一,就是当前对象的“朋友”,否则就是“陌生人”。在应用迪米特法则时,一个对象只能与直接朋友发生交互,不要与“陌生人”发生直接交互,这样做可以降低系统的耦合度,一个对象的改变不会给太多其他对象带来影响。
迪米特法则要求我们在设计系统时,应该尽量减少对象之间的交互,如果两个对象之间不必彼此直接通信,那么这两个对象就不应当发生任何直接的相互作用,如果其中的一个对象需要调用另一个对象的某一个方法的话,可以通过第三者转发这个调用。简言之,就是通过引入一个合理的第三者来降低现有对象之间的耦合度。
在将迪米特法则运用到系统设计中时,要注意下面的几点:在类的划分上,应当尽量创建松耦合的类,类之间的耦合度越低,就越有利于复用,一个处在松耦合中的类一旦被修改,不会对关联的类造成太大波及;在类的结构设计上,每一个类都应当尽量降低其成员变量和成员函数的访问权限;在类的设计上,只要有可能,一个类型应当设计成不变类;在对其他类的引用上,一个对象对其他对象的引用应当降到最低。
闹钟App设置闹钟时,都是通过AlarmManager,即AlarmManagerService服务来实现的,
每次创建或者更新闹钟时,都会调用AlarmManager.setExact()来向AlarmManagerService服务设置闹钟响的时间;
AlarmManagerService服务通过native函数set()来设置内核中闹钟,并且发送广播AlarmManager.ACTION_NEXT_ALARM_CLOCK_CHANGED来通知SystemUI进行系统图标的显示,同时会循环调用native函数waitForAlarm()监听到Alarm变化,当监听到有Alarm时间到了,也会发送AlarmManager.ACTION_NEXT_ALARM_CLOCK_CHANGED广播出去;
SystemUI的PhoneStatusBarPolicy.mIntentReceiver会监听这个广播,当接收到AlarmManager.ACTION_NEXT_ALARM_CLOCK_CHANGED广播后,调用StatusBarManagerService服务来设置状态上显示的system icon和icon visibility:
mService.setIcon(SLOT_ALARM_CLOCK, R.drawable.stat_sys_alarm, 0, null);
mService.setIconVisibility(SLOT_ALARM_CLOCK, mCurrentUserSetup && hasAlarm);
在StatusBarManagerService.setIcon()中,服务会通过IStatusBar mBar来处理icon的显示情况,
mBar就是SystemUI中BaseStatusBar的IStatusBar.Stub子类CommandQueue类mCommandQueue对象,通过注册到StatusBarManagerService服务中的,
BaseStatusBar创建mCommandQueue对象时,还把实现了CommandQueue.Callbacks接口的BaseStatusBar对象也传递过去,
CommandQueue mCommandQueue = new CommandQueue(this,mIconList);
这样StatusBarManagerService服务就可以通过SystemUI中的IStatusBar.Stub子类CommandQueue类mCommandQueue对象来调用SystemUI来处理icon显示
注意:因为notification icon和system icon是状态栏上左右两边的不同的图标,左边是通知图标(notification icon),右边的是系统图标(system icon); system icon显示是不受notification影响的,所以调用NotificationManager发出通知是不会在system icon区域显示图标的,只会在notification icon区域显示,所以这里实现闹钟图标显示时是Alarm通过AlarmManagerService发广播给SystemUI的PhoneStatusBarPolicy,SystemUI再调用StatusBarManagerService服务添加icon,StatusBarManagerService服务再通过SystemUI的CommandQueue对象来实现在SystemUI中显示icon的。

AlarmProvider.java
1 | public static void enableNextAlert(Context context) { |
在闹钟App中调用AlarmManager的setExact()方法后,这里AlarmManager就会通过IAlarmManager.Stub和AlarmManagerServie通信Binder通信。
AlarmManager.java
1 | public void setExact(int type, long triggerAtMillis, PendingIntent operation) { |
更新SystemUI状态栏中系统图标闹钟图标的广播是从AlarmManagerService这个服务中发出来了,这样可以所有App中设置闹钟的逻辑都会集中在这个服务中来处理。
AlarmManagerService.java
1 | private final IBinder mService = new IAlarmManager.Stub() { |
以下是如何调用内核来设置闹钟和闹钟时间到后的处理逻辑,可以参考如下,不过这里我们只是跟踪状态栏上系统图标中闹钟图标的显示过程,所以就不深入跟踪了,有兴趣的同事可以自己研究。
1 | void rescheduleKernelAlarmsLocked() { //调用内核的native方法设置闹钟 |
PhoneStatusBarPolicy.java
1 | private final StatusbarManager mService; |
StatusBarManagerService.java
1 | private volatile IStatusBar mBar; |
这里的IStatusBar其实就是SystemUI中的CommandQueue类,它是IStatusBar.Stub的子类,它是在BaseStatusBar的start()方法中通过获取StatusBarManagerService服务对象,调用服务对象的registerStatusBar(IStatusBar bar, StatusBarIconList iconList,int switches[], List
1 | protected IStatusBarService mBarService; |
CommandQueue.java
1 | private Callbacks mCallbacks; |
PhoneStatusBar.java
1 | StatusBarIconController mIconController; //状态栏图标控制类 |
StatusBarIconController.java & StatusBarIconView.java
1 | //StatusBarIconController.java |
通过以上对状态栏中闹钟图标的显示过程,我们可以知道,状态栏右边的系统图标的显示,是可以由系统App控制来显示的,系统App可以通过获取StatusBarManagerService这个服务对象来设置状态栏中的系统图标。
代码实现如下:1
2
3
4private static final String SLOT_ALARM_CLOCK = "alarm_clock";
private final StatusBarManager mService = (StatusBarManager) context.getSystemService(Context.STATUS_BAR_SERVICE);
mService.setIcon(SLOT_ALARM_CLOCK, R.drawable.stat_sys_alarm, 0, null);
mService.setIconVisibility(SLOT_ALARM_CLOCK, mCurrentUserSetup && hasAlarm);
还要记得在AndroidManifest.xml文件中加入以下权限:
<uses-permission android:name="android.permission.STATUS_BAR_SERVICE" />
<uses-permission android:name="android.permission.STATUS_BAR" />